Showing posts with label Wedding Soap Favors. Show all posts

Monday, May 05, 2014

How to Make Flower Pot Soaps


FINALLY! The flowers are beginning to bloom in Michigan. To celebrate, Sophie Soap Chick, planted a few soap flowers in Mold Market's flower pot mold. Sophie shares the 'how-to' information below.

Items Used:


First, I started mixing together ingredients to make the flower pots. I used white soap base and then added two drops of brown oxide and 1 small drop of orange oxide (Don’t forget to add fragrance). This made the creamy looking brown color that works perfect as a pot. I then poured this in the Mini Flower Pot Mold and let set.
Flower Pot Halves


While the Mini Flower Pot was setting, I moved on to making the flowers. For this I used the 8-inch Silicone Roll Tray. For the yellow flowers, I melted down white soap base and then added two drops of Neon Yellow. Make sure to spray down the tray with alcohol spray so there will be no sticking. I only poured the yellow until it covered the bottom. Do not make it too thick or your flowers wont stand correctly on the pot. After the yellow set, I then continued this process to make the pink flowers, the flower stems & leaves, and the dirt (one black and one brown, later will cut little pieces and mix them together).

During those setting, I took out the Mini Flower Pots and began cutting the tops with the Recessed Smoother Soap Tool. Make sure to keep a lip to hold in the dirt and to give the effect of a real flower pot. Once they were both even and fit properly, I used clear soap base to attach the two parts. Some of mine didn't stand up straight, so to fix this you can use the tool again and shave the bottom a little bit until it sits properly.

Join the two flower pot halves
with clear soap base.
To make the flowers, I used the smallest of the Flower Cutter Set and used it with the pink and yellow. For the stems I used the Recessed Smoother Soap Tool and then rolled with my fingers. For the leaves, I used the same tool and carved them out by hand. To attach all these I used the clear soap base.

For the dirt, I used the black and brown that I made out of the tray and used the same Recessed Smoother Tool. I used the curved end and with a flicking motion, popped out little pieces of black and then brown. This did take a little while, but after getting the hang out it becomes quicker. Make sure to attach the flowers in the pot prior to putting the dirt in. Once the flowers were in place of where I wanted them, I then sprinkled the dirt all over.

These turned out SUPER CUTE and I hope you all have a great time making these! Although, these take a few hours to make, the end result is so worth it!!!


Wednesday, January 23, 2013

Sealed with a Kiss Valentine Envelope Soap


Melt & Pour Soaps: Sealed with a Kiss Envelope Soap

I love, love this new Valentine soap. It soooo easy to make and makes a statement. The lipstick kiss was an afterthought and I'm glad I did it.

Mold Market's Basic Square mold was used for the envelope and the edges trimmed with our wavy cutter. Trimming the edges added more interest to the shape.

The envelope flap was poured in the same square mold, but just a thin layer of soap. Remove and cut into triangle shapes and trim to fit the square.

The heart from the mini-cutter set was used for the heart seal. You can use any shape you want. If you happen to have a envelope sealing stamp lying around in a desk draw, it could prove to be an awesome embellishment.

Wax Heart Stamp


Melt and color a small portion of clear soap, color red and pour a round blob of soap onto wax paper. Let it set-up until slightly hardened and then use the wax heart seal to make an impression. Peel off the wax paper and apply (glue) to the envelope soap with clear clear melted soap.


Heads up on a few things when making this soap:

  1. Tip the mold when applying the glitter. We coated the envelope flap with clear soap and then brushed on the glitter using one of our mica brushes.
  2. Set the glitter application (once dry) with a light spray of hairspray to keep the glitter from falling onto the envelope area.
  3. Use clear melted soap to adhere the envelope flaps the the heart seal.
  4. We used smear-proof lip color to kiss our soaps and then lightly sprayed with hair spray to seal the color.

Product Used:

Liquid gel colors are always our first choice. A very small amount of Neon Bright Pink was used in white soap base for the envelope.

Hot pink glitter mixed with white glitter was used to glaze the envelope flap. The small red heart is colored with Tomato Red liquid gel and stamped out with the mini heart cutter.

Sure hope this gives inspiration to your Valentine soaping projects!

Sunday, January 13, 2013

Melt & Pour Soap Making: Wedding Soaps


This is one of the newest molds from Mold Market. Use it for soaps, jello or chocolates. If you partially fill the mold cavity (1/4 of the depth) it will produce a nice size chocolate bar.
 
I love how the border and I DO text can be color themed. It is best to use the GPE injector tool to fill the letters and border.

We are currently offering 15% off this mold until February 3, 2013. Click here for the special discount. The shopping cart will calculate the discount once you click the Add To Cart button.
 

Tuesday, August 21, 2012

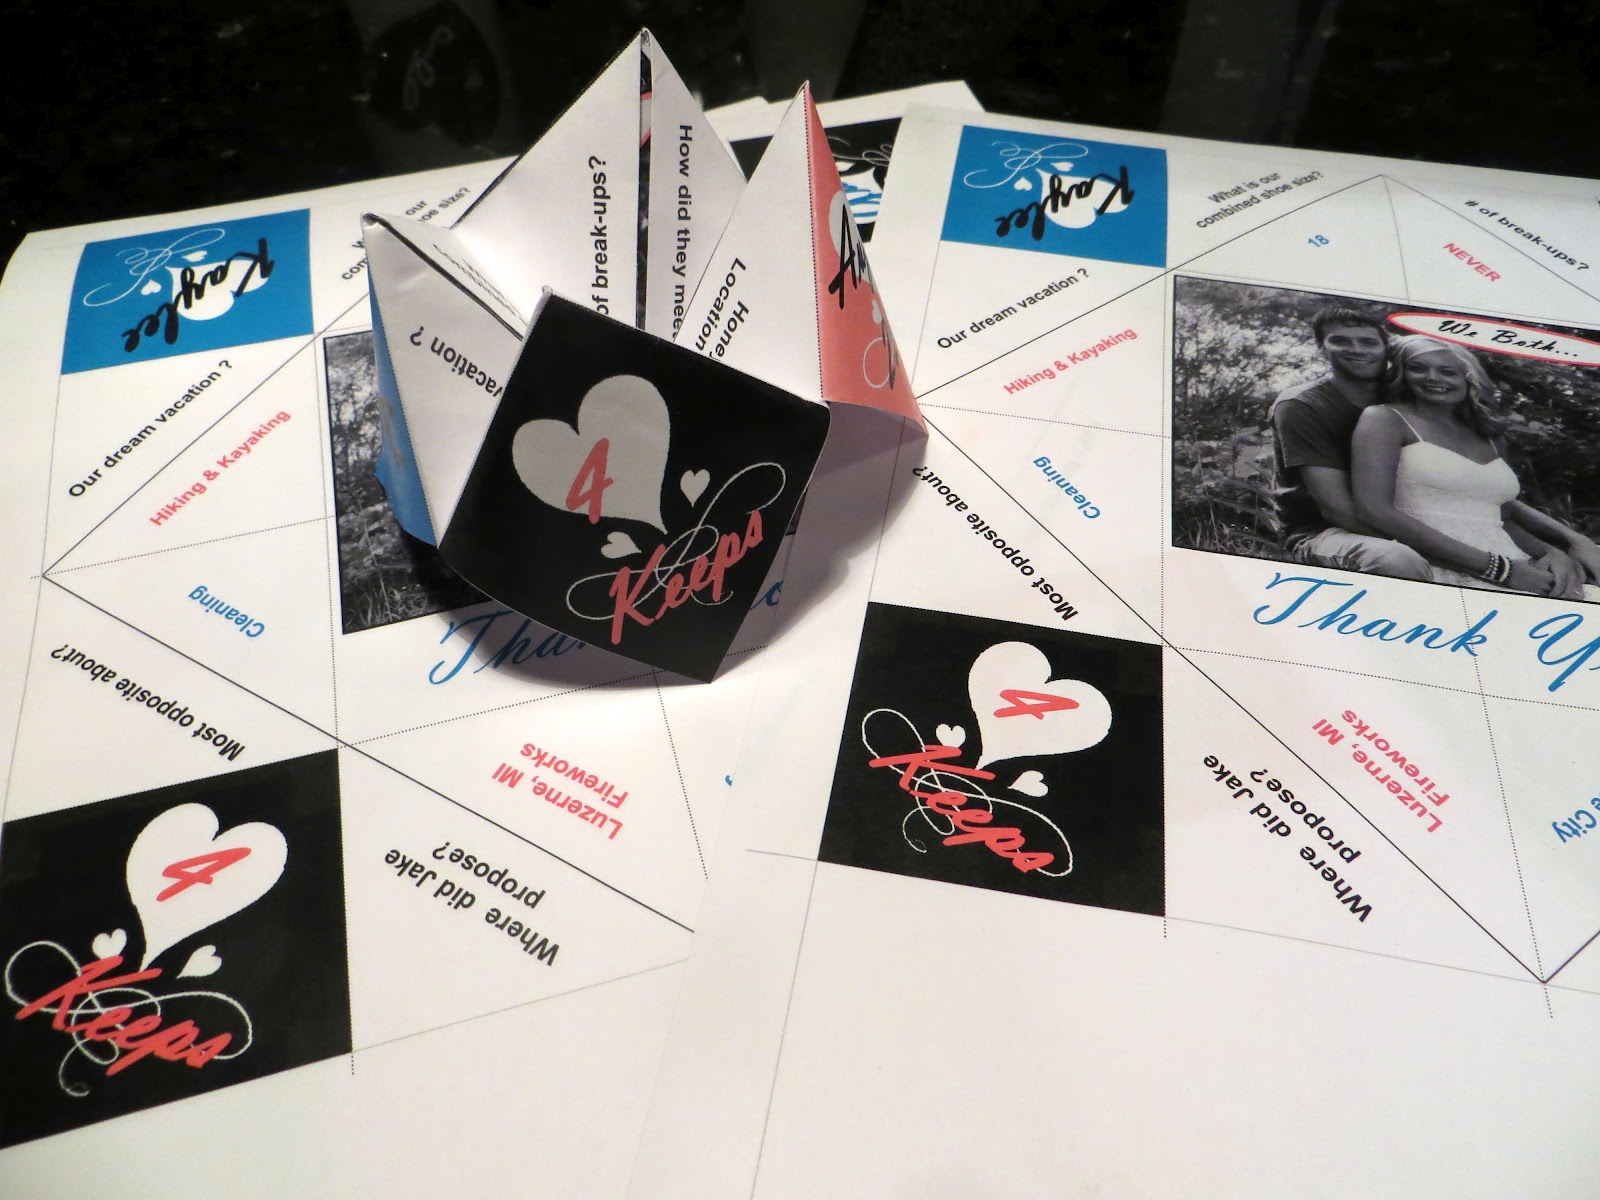
Wedding Cootie Catchers


Wedding Cootie Catcher

For the past month, I've been preparing for an upcoming wedding. I'm doing the reception tables and it's been a blast coming up with "Shabby Chic" ideas. These Wedding Cootie Catchers will be part of the table ensemble. I had totally forgotten about this origami design that we made as kids. It was my nine-year old grandson that inspired this idea.

As I was looking over wedding trivia sent to me by the bride, my grandson said, "NeeNee, you should do cootie catchers!" I was absolutely clueless what he was talking about. "Let me Google it, NeeNee."

And so, cootie catchers have been incorporated into the wedding table theme. I am excited to see how all my decorating plans fall into place. Fresh flowers arrive on Thursday for the painted wine bottles, the personalized fortune cookies were delivered last week, and finishing detail touches are near completion.


Hoping the weather cooperates for the outdoor wedding ceremony. Thankfully, the reception is indoors. No matter what the weather holds, my former administrative assistant of 7 years is getting married. I couldn't be happier for her.


Tuesday, August 07, 2012

Melt & Pour Soap Making: Wedding Soaps


GoPlanetEarth.com Water Dissolving Soap Paper

We finished up our final day of personalized wedding soaps for an upcoming event. They turned out awesome. Thanks to Gabby and Chelsea who learned the tricks of using the GPE water dissovling paper. Their first try wasn't quite as successful, so I'm posting a few tips they learned when using this paper in the molds.

  1. Our entire staff agreed a white soap background offers the best results.
  2. Pour a very thin layer of unscented ultimate clear soap in the bottom of each mold cavity. DO NOT spray with rubbing alcohol. If any air bubbles appear, use your finger to pop them.
  3. Allow the thin soap layer to set up completely. Once set, insert and center your pre-cut paper design/logo.
  4. Melt your white soap base and allow to cool to around 130 degrees. Add desired fragrance oil.
  5. Slowly fill the balance of the soap mold with the white soap.
  6. Spritz the back of the soaps with rubbing alcohol once poured to remove any surface air bubbles.
  7. Do not remove soaps from the mold until they have completely set-up.
The following Mold Market molds were used for this soaping project: #006 Beveled Oval Mold, #011 Beveled Border Circle and  #005 Beveled Border Square. The templates can be purchased here. The templates DO NOT include any printable GPE water dissolving paper. That is a separate purchase.


GoPlanetEarth.com Water Dissolving Soap Paper

Saturday, August 04, 2012

Shabby Chic Wedding Ideas


GoPlanetEarth.com Water Dissolving Soap Paper

I've attended my fair share of weddings this summer. There's one more wedding on the calendar for late August. This one is extra special for me. My former administrative assistant, Kaylee, is the bride . Besides planning a wedding and working part-time, she starts the U of M nursing program at the end of this month. She's one ambitious girl and I'm extremely proud of her.


GoPlanet's wedding gift to the bride and groom are reception table decorations. Thankfully, Kaylee is no "bridezilla"; so, it's been fun sorting through shabby chic decorating ideas. The final verdict: Painted wine bottles. A collection of assorted wine bottles filled with hydrangeas, Queen Annes' Lace, and other wild flowers will adorn the tables.


Our monogram soap text matches some of the wine bottles wedding labels.

In keeping with the theme, my staff made monogram soaps using GPE water dissolving paper.  GoPlanet offers templates for use with a number of Mold Market basic shape molds. These templates can also be used with GPE Printable Soap Paper.

Keep in mind the water dissolving paper disappears when introduced to water. The GPE Printable Paper has a vinyl type finish. It does not dissolve.

Instructions for Using Dissolving Soap Paper

1) Print your picture onto the water dissolving paper. We used a color laser printer. Make sure the laser printer is cool before printing each sheet. Otherwise, the paper may become stuck in the print roller.

2) Cut out each design to fit your mold.

3) Melt a small amount of Ultimate Clear soap base (do not add any scent!). Cool to 135 degrees and pour a thin layer into the mold cavity. Let the soap set up until firm.

4) Position the picture logo on top of the poured soap. VERY lightly spritz a layer of rubbing alcohol onto the back of the picture. You don't want the picture to start dissolving, so use discretion when spraying the alcohol.

5) Fill the remaining portion of the mold cavity with white soap base. For our project we used Mold Market # 011. Scent as desired. Pouring temp should be around 130 to 135 degrees. You don't want to melt the paper.

6) Let soap set up for several hours until firm enough to release from the molds. DO NOT put soap in the freezer. These soap types need to set up at room temperature.


Wednesday, July 18, 2012

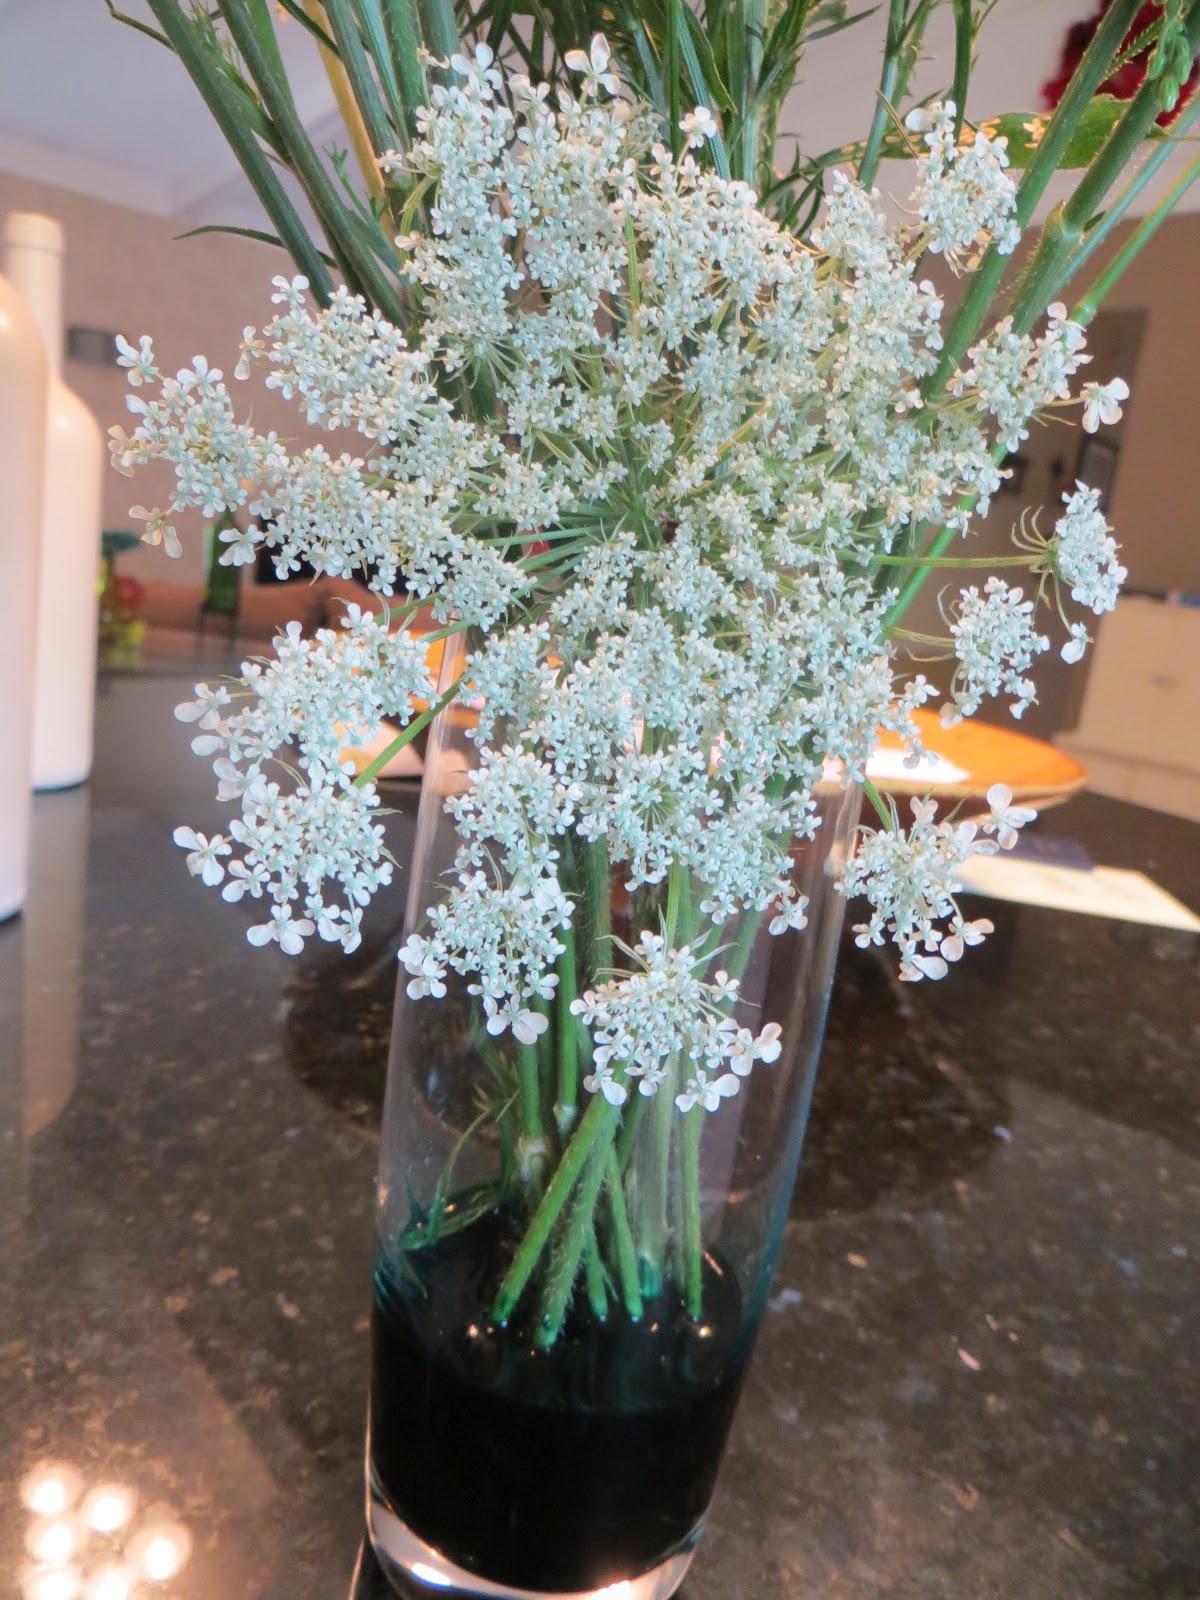
Coloring Queen Anne's Lace Flowers


How to Color Queen Anne's Lace Flowers

The whole state of Michigan, as well as 60% of the US, is suffering extreme drought this summer. Queen Anne's Lace is one of the few flowers thriving in the heat. It's considered a wild flower but, surprisingly it's a direct relative of the carrots we eat today. In Michigan, it is commonly found in dry fields or along road sides. Most of us never give it the time of day. However, the delicate lacy blooms are a coveted filler in summer wedding bouquets.

One of my staff members is getting married next month. It's a casual outdoor setting and she asked for help decorating the reception tables. Queen Anne's Lace seemed the perfect choice since Mother Nature has provided an abundant crop.


The wedding colors are turquoise and coral. Since this flower readily accepts dye, the petals can be color themed to fit any wedding. Here's a pic of the turquoise flowers. I'm experimenting with a coral color this week. I'm excited to see the trio of white, turquoise and coral flowers intermingled within wild greenery.

Coloring Queen Anne's Lace Flowers

The flowers will display in chalkboard graffiti wine bottles with random placement of crystals and jewels to add conserative 'bling'. Fun graffiti plans are in the works for the wedding guests (can't share at this time).

You may purchase the dye to color these flowers at GoPlanetEarth. Mix 2 parts water to one part dye. Allow flower stems to sit in the mixture for 4 hours, then add additional water. Let stems absorb the dyed water overnight. You'll be surprised with the color change after 24 hours.

TIP: Cut the flower stems at an angle before placing the the colored water.

Monday, July 02, 2012

Fortune Cookie Wedding Favor


Fortune Cookie Wedding Favor Soaps

The last few weeks, I've been brainstorming about wedding favors. GoPlanetEarth is gifting wedding favors to one of  our long time workers, Kaylee. She been with us for seven years and is tying the knot in August. Her wedding colors are turquoise and coral. I love the bright color combo.

The final (Kaylee approved) favor is pictured. The coral ribbon was shipped from Hong Kong. Yes, that's correct... Hong Kong! I needed just the right coral color, so I jumped on Ebay and found the perfect match.  Bulk chopsticks and turquoise take-out boxes are enroute.

I designed the round monogram seal and seating placement card in MS Publisher. A personalized fortune cookie is tucked inside each box. Kaylee is foregoing seating assignments, so I will be revising the favor card. In place of the guest name and table, there will be a message for each guest to do a "fill in the blank" fortune for the wedding couple. Guests slide the card from the chopsticks, fill in a message and drop card in a fortune cookie shaped box. How fun!

Fortune Cookie Wedding Favors


Place 2-3  fortune soaps in each box (heat-seal them in a poly type bag before placing in the box). Consider dipping cookie soaps in colored soap base and embellishing with sprinkles. The packaging design pictured might include coral colored soaps dipped in a turquoise color and dressed with white sprinkles, or vice versa.


Let your imagination run wild! There are so many color combinations you can use.
Checkout GoPlanet's printable fortune cookie sayings.

Chocolate drizzled fortune cookie soap favors.


Friday, June 08, 2012

Melt & Pour Soap: Asian Twist


The Goplanet staff had fun pairing soap colors for Mold Market's #214 Eternal Love mold.  My favorite is the pink and black, though each soap turned out equally well. Email for the colors used in this photo shoot. They are all colors from the GoPlanetEarth liquid gel line.

These make awesome wedding shower favors. Pair with bamboo chopsticks and a gift tag that reads,
Love is like a pair of chopsticks.
One cannot function without the other.
Both must be willing to handle all kinds of tastes:
sweet, sour, bitter, spicy...


These soaps fit GoPlanet's  4 x 2 x 9 cello bags. Just be sure to wrap each soap before placing inside the bag. Close the bag with a colorful fabric ribbon and a set of chopsticks (you can cut the chopsticks to size if you want).