Monday, June 17, 2013

Melt & Pour Soap Making: Mickey and Minnie Soaps


Over and over again, I am amazed at the many ways Mold Market's cupcake base and large bath bomb are being used to create fun designs. Our Sophie Soap Chick was on a soaping extravaganza the last couple of weeks. This is the first post of the many things I will be sharing from Sophie's soaping adventures.
 
I always give Sophie a shout out of ideas I would like her to try. When I suggested something Disney themed, she wasted no time. This project is easy enough for even the novice soap maker.


Ingredients used:
Here are Sophie's instructions on how to make and assemble the Mickey and Minnie soaps:

  1. Melt clear soap base, add black colorant and poured it into the large bath bomb mold.
  2. Melt clear soap base, add tomato red colorant and pour into the cupcake base.
  3. While these set up, pour the extra red color into the flexible jelly roll pan. Don't pour too much because you want it thin enough to be able to carve and bend it to shape the bow. Hand-carve the bow with the carving tool making almost a figure eight without cutting the center (use the white soap base to make an extra circle for the center of the bow).
  4. Pour black soap into the jelly roll pan. Once it is almost fully set, remove and hand carve the ears with the carving tool. It took a few tries to make them look like mouse ears. Once I got four to match I fixed up the edges and pushed in the center to curve to make it look more like a mouse ear.
  5. Melt white soap base and pour into the jelly roll mold for the buttons. I used the bottom of a small Chapstick to outline the perfect circle and then cut it out with the carving tool. Once everything was cut I began assembling the mice. I attached the base and head first with clear soap.
  6. The ears and buttons were next which completed Mickey. I secured the white circle to the bow with melted soap and attached it to Minnie. I off-centered the bow to give it some character. 
The rubbing alcohol spray helps with air bubbles than occur when pouring soap into the molds. These soaps will fit GoPlanet's clear cupcake boxes. Scenting the soap base is optional.

Sunday, June 16, 2013

Don't Let 'Sameness' Validate You


 “I don’t want that one, NeeNee, it’s different.” Those were the words spoken by my seven year old granddaughter, Olivia, as I handed her a handful of fresh cherries.

“What’s wrong with it”, I asked?

“It doesn’t look like the rest of the cherries; it’s not the same color.” Without hesitation, she exchanged the cherry for one that resembled all the others. “There”, she said, “now they all look alike”.

It was an innocent, yet thought provoking, statement that triggered a red flag. Might she be swayed to take the road less traveled in life because it is wasn’t a popular choice? I wondered if she viewed sameness as a validation of acceptance within her peer group.

I tend to be OCD, so maybe I overplayed the whole cherry conversation; but one thing is certain, following the masses to “fit in” has never been an option for me. I like the idea of traveling the road less traveled. There is excitement in bushwhacking my own path in life and living with a fearless desire to see what lies ahead. Of course, blazing new trails doesn’t come without opposition or obstacles.

There are things to consider before taking the road less traveled.

1.       The road less traveled is narrow and often lonely. You won’t earn popularity votes.

2.       You will encounter plenty of people who didn’t follow their dreams, or gave up; I call them dead soldiers. Avoid their discouragement and stay focused on the road you’ve taken.

3.       Don’t expect everyone to understand your choices.

4.       Failure is not the end. Those on the popular track are waiting for some miracle to land in their lap. Guess what? Miracles don’t happen without hard work.

5.       Set your own challenges. Become the CEO of your own life and set goals different from others.

6.       Success isn’t measured by time; it’s measured by experiences and opportunities that allow you to know what works best for you.

7.       Understand that trailblazers disrupt nature; they overturn rocks, cut down trees and move dirt. If they can’t remove the obstacle they build bridges over or around it. Sheer determination cuts through barriers and obstacles.  

8.       Taking the road less traveled is for leaders; they point the way, take the risks, and have a vision for turning their dreams into reality.

9.       Know your passion and gifts. You need to know with absolute certainty that the path you’re blazing is the right one for you.

10.   Trailblazers create a path where none existed before.
 

As an online entrepreneur and manufacturer for over 15 years, I’ve learned valuable lessons from the school of hard knocks, both personally and professionally. One thing is certain; an individual deemed an odd-colored cherry, regardless of age, has two choices. They can let sameness validate them or embrace their uniqueness and take the road less traveled.  I want my granddaughter to understand she doesn’t have to be like all the other cherries in the (peer) pack; or, stifled by other people’s expectations and limiting thoughts.

When the time comes for Olivia to venture out on her own, NeeNee will be there with a shovel, ax, hammer and backhoe. She can count on me to mentor, saw trees, chop thorny bushes and build bridges as she blazes her trail in life. And may she find a bowl of odd-colored cherries at the end of her trail; a reminder she took the road less taken.


Friday, June 07, 2013

8 New Mold Designs from Mold Market

Eight new soap mold designs from Mold Market will arrive mid-June. I can't wait to start working with these molds. I'll keep you posted on arrival date.

Thursday, May 30, 2013

Made in the USA Cupcake Soap


Our Soap Chick, Sophie, has been at it again. This "Made in the USA" cupcake soap was inspired by nothing other than the American flag.
 
 
Sophie used Mold Market's cupcake base and Mold Market's large bath bomb mold. The stars were hand-cut from red and blue soap. You can also use varying sizes of star cookie cutters.


Score the cupcake base with fork prongs to help seat the cupcake top. Clear, melted soap secures the two pieces together as well as the stars.


Sophie used white soap base in this project so the red and blue colors don't really POP. I suggest using clear soap and red colorant for the cupcake base and pour the top in white soap along with clear soap (add ultramarine blue to the clear soap).

Using clear soap would give the same red and blue colors in the American flag.


Other ideas for the Made in the USA soap:

  • Pour the top in alternating blue and white colors only make the stripes thinner
  • Use clear soap for the first layer of the top and embed a star, sprinkle with silver glitter. Pour remainder of top in stripes.
  • Make the cupcake base blue and the stripes white and red


Monday, May 06, 2013

Melt & Pour Soap Making: Embellishing Your Soaps


Mold Market's soap molds take soap making to the next level. If you don't believe me, take a look at what Maria at Kokolele Soap has done with Mold Market's ice cream cone mold. Maria told me she was so delighted to discover this mold could me used to make a 3-D soap.


Mold #239 (Soft Serve Ice Cream) has a flat back. However, when you join the halves, you get this wonderful 3-dimensional soap which you can embellish to your heart's content.

Maria's soap artistry is amazing.

These are the new border trims from Mold Market available in June 2013. Use them to embellish your soaps. There are six border strips on each mold.

 
Here is a former blog post on how to make the different colored layers for the ice cream soap.


Here is another creative soap by Maria using Mold Market molds. I have purchased a number of soaps from Maria's Etsy shop and I must say, they are perfection with lovely packaging and labels.


The above soap is made with Mold Market's cupcake base and a small bath bomb mold. The two pieces are connected with clear soap base and embellished with a rickrack soap border.
Wednesday, May 01, 2013

How To: Mother's Day Picture Frames


I've been on a Mother's Day craft marathon this past week with my grandkids. We've made paper Mache vases, sun catchers and our final project is ice cream stick picture frames.


These refrigerator picture frames are easy, inexpensive and colorful. Supplies include:
  • Craft Popsicle sticks
  • Craft glue
  • Glitter
  • Paint
  • Plastic buttons
  • Scrap ribbon
  • Business card magnets
  • Printer and camera


Form a square frame with the pop sticks. I attached two parallel sticks at the top and bottom, and one stick between the two layers. A diagonal stick was used on the back side to keep the picture in place.

Spray paint or brush on tempera paint with a brush. I used spray paint. Allow the sticks to dry between each coat of paint.


Decide how button arrangement and where you want to place glitter. Layering the buttons by size will give added depth. Allow the picture frame to set up overnight.


When the embellishments are dry, print and trim photos to side into the sides of the frame. The diagonal pop stick will help keep the picture in place.


The last step is to adhere the business card magnets to the back of the frame. I used on full magnet and trimmed a second to fit. Hot glue worked best for securing to the wooden sticks. Even though the magnets had an adhesive backing, they didn't seem to stick well. The hot glue worked great.

Glue the business card magnet to the back side of the frame.

Monday, April 29, 2013

How To: Mother's Day Paper Mache Vase


Meet my granddaughter, Olivia. She's the budding artist behind this beautiful flower vase she made for her mommy. Olivia couldn't wait to return from her soccer game so she could begin painting the vase. It seemed like it took forever for the Mache paste to dry (at least in her mind).


Four year old, Fischer, also had to get his hands into the messy, gooey paste. I think the kids favorite part was playing in the goop. I was cleaning up dried flour paste for days.

We used plastic bottles from Daily's Bloody Mary mix. When working with a four and six year old, plastic was the better choice.

My honey-man brought home old newspapers from the tire store (he was there getting his tires rotated). The newspaper was torn into strips, some long, some short and dipped into a mixture of flour and water.

The paste was made with 2 cups flour and 1 cup water. These measurements aren't exact, but close. The Mache paste should be the consistency of cake batter with no lumps.

Apply the paper in layers covering the entire bottle.  Allow layers to dry before the next application. The waiting is difficult for the kids, but you can generally apply the next layer within 15 minutes if you haven't over-saturated the newspaper with the mix.
 
I did mention messy, didn't I?
We found three layers worked well. The third layer was plain white paper, though this isn't necessary. It does, however, offer more painting options. Let the bottle dry overnight before applying paint (the kids used tempera paints).
 

A word of advice...cover the work surface with plenty of paper. I keep a big roll of Kraft paper on hand for these messy projects.

Once the paint was dry, I gave them a thin coat of clear acrylic spray to seal the paper coating. Fischer didn't want any added embellishments on his vase, but Olivia was all over the idea (must be a girly thing).
 
I hot-glued coordinating grosgrain ribbon around the bottle and added a colorful sun catcher to the bottle neck. It was a sun catcher left-over from another project I did with the grandkids. What mommy wouldn't love to receive this colorful vase on Mother's Day? I know I would.

Sunday, April 21, 2013

How To: Mother's Day Sun Catcher's


This year I am committed to giving handmade Mother's Day gifts. The grand kids are excited about these colorful sun catchers that we made by melting plastic beads. You can find beads at just about any retail craft or online store. I used leftover beads I had from other summer craft projects I have done with the grand kids.

This short tutorial gives instructions to make these colorful sun catchers. If you're looking for something to craft by hand for Mother's Day, this might fit the bill. The cost will also fit your wallet. One 8-inch round sun catcher cost me under $1.00 to make.


Tuesday, April 16, 2013

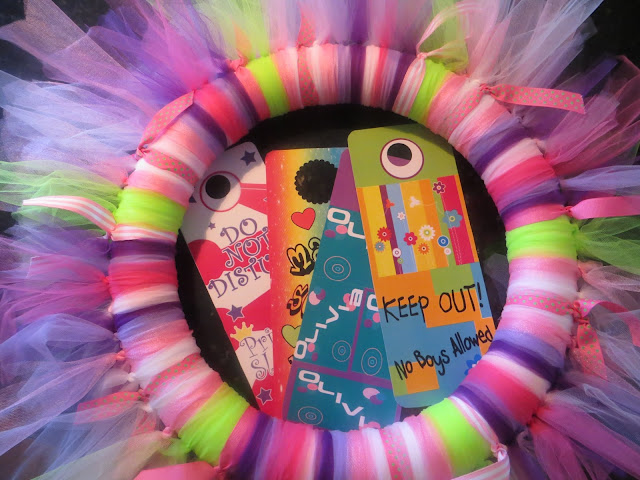
How To: Easy to Make Tull-ific Door Wreath


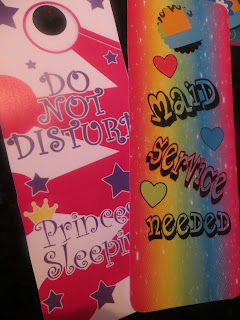
My six-year old granddaughter (soon to be seven, as she will quickly point out) is all things 'girlie". If it's pink or purple, she owns it. If it's anything that sparkles it's hanging in her closet. I'm fairly certain she will embrace this Tull-ific door wreath I made for her over the weekend. It has 4 interchangeable signs that hang in the center of the wreath. She can flip to whatever sign suits her mood. There should be a 5th sign that reads: DO NOT ENTER... I'm in Time Out!

The first step is deciding on your color palette. I selected colors in my granddaughter's bedroom, but you can do a autumn, Christmas or colors that match your décor.

I used pre-cut tulle on rolls. You can purchase tulle by the yard at fabric stores and cut into strips if you are so inclined. I find the rolls easier to use and store.

My wreath uses 19 and 24" lengths (the tulle rolls are 6 inches wide). 


For added interest I also used three different grosgrain ribbon patterns; solid, dots and striped. The white Styrofoam wreath is 18" in diameter; a 12" diameter will also work.

The finished wreath has roughly (42) 19" tulle strips, (36) 24" tulle strips and (12) 15" cuts of ribbon.  I cut about 1/3 of what I thought would be needed until I got a feel for how much area each tied piece would cover.

This is a craft that is ideal for camps, vacation bible school, after school activities or in a classroom. No water, glue or messy clean-up is involved; just a pair of scissors and a ruler.


 I noted a couple of different techniques were given for attaching the tulle to the Styrofoam. The first method of threading the tulle through a loop didn't work. It took less time, but the tulle didn't stay attached to the ring. That method is shown below.


First looping method did not work well.

The best method was wrapping the tulle around the ring twice (as shown below) and then tying off in a knot. It's really that simple. Continue wrapping and tying the tulle strips until the ring is completely covered. You can embellish with flowers, painted wood cut-outs, ribbon, bows...there are countless options.  
 
 
I placed six, 24" strips between seven 19" strips, alternating in color sequence around the ring.

Example: My six 19" strips consisted of dark purple, light purple, dark pink, light pink, dark purple, light pink. The 24" strips consisted of glittery pink, white, a strip of ribbon, white, glitter pink, two strips of lime green.

Fill in any sparse areas after the wreath is finished. I left the tulle edges straight on the shorter pieces and made a v-cut on the longer pieces. You can even round the edges if you want.


Here is the wreath hanging.


Here is the wreath lying flat.


Here are the door hanger signs for the wreath. I made them using a photo editing program and then printed on card stock. A scrapbook punch was used for the hang-hole. A hook attached to the back side of the wreath will allow my granddaughter to switch out the signs at will. My honey-man is making the hook. Not yet sure how or with what, but he promised he had a plan.


Monday, April 15, 2013

Update on the Dr. Seuss Truffula (Lorax) Tree Project


Dr. Seuss Truffula Trees from Lomax

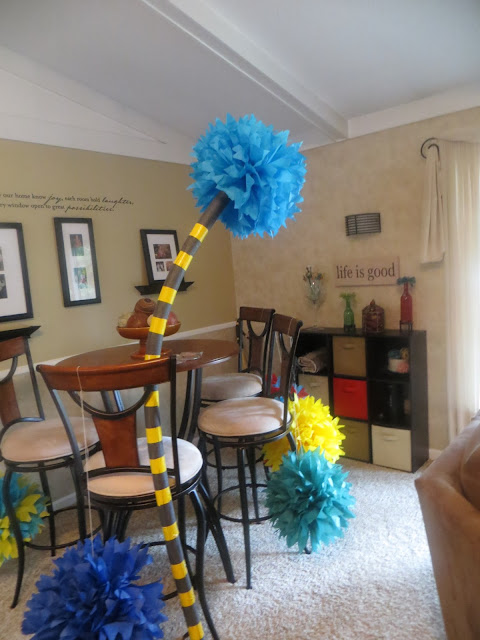
Here's one of the finished Truffula trees for my grandson's party. Right now it has to be propped up until the stands are made to hold it upright. I'm not going to support the entire trunk. I want it to lean slightly, so the wooden dowels being inserted in the 6 foot tubing will be cut into 4 1/2 feet lengths.

The shorter trees will be made with 4 foot tubing and the dowel inserts will be cut to 3 feet. My post about making the trees is found here.

Dr. Seuss Truffula Trees from Lomax

Sure hope it doesn't rain the day of the party. Tissue paper isn't exactly waterproof. I do have an indoor plan B, just in case.

Saturday, April 13, 2013

How to: Make Dr. Seuss Lorax Trees (Truffula Tree)


Well it's that time of year again, grandkids birthday parties. They always count on NeeNee to make their celebration special and, of course, I do. My five-year old grandson, Fischer, decided he wants a Cat in the Hat party theme. Party decorations are very important to him; so, I'm tend to go a little over the top.


Pictured above are the invites I made for his party. Below are photos of the colorful tree toppers I will use for the Lorax trees. The toppers will be seated atop six and four foot foam pipe insulators (the kind with a slit running down the length of the tube).


My son-in-law is making stands to keep the trees upright. The hollow insulation tube will slide over the wooden dowel and yellow duct tape will be wrapped around tube every eight inches. A light-weight wire will secure the tissue toppers to the insulator tube.


 What you need:
 
  • 16 x 20" sheets of tissue paper (any color)
  • Thin wire or string
  • Scissors
  • Yellow duct tape
  • Pipe insulator tubes (2 inch diameter x 6 feet or 4 feet)
  • Stands to keep the trees upright (you can tape to a wall or posts if you don't want to make stands)
 Fold 8 sheets of tissue paper accordion style (begin folds on a short end). Fold the tissue in half to find the midway point, then tie with a string or piece of wire. Trim the ends into a point.


Fan out the folds and carefully pull four layers of tissue from each side toward the center.

Flip the tissue over and do the same for the other half. Once all the paper has been pulled toward the tied center, fluff out the tissue pieces to form a uniform looking ball.


It's that simple! Try layering different colors of tissue paper for added variety. Hang from the ceiling in different sizes. Just cut the tissue paper width by a few inches. Each tissue ball cost me 50 cents with string/wire added in the cost. If making the Lorax tree trunk, the insulator tubing runs under $2 at Home Depot.

When the party is over, I'm donating the Lorax trees to a local library for a Dr. Seuss display.