Friday, April 29, 2011

Empty Pallets, Empty Cartons: Thanks Missy!


This has been a very busy stock week. Pallets of soap base and cartons of soap molds along with other misc shipments. Missy is in charge of incoming stock and she worked hard to get everything put on the shelves. The overflow of stock had to go to our second warehouse which meant having to use a dolly cart in pouring rain to move the stock. Our overflow warehouse is just a stones throw from our main place, but wouldn't you know this entire week would be rainy weather. Missy was a trooper and did what she had to do. Thanks, Missy for all your hard work.


Our new GPE soap bases arrived and are ready to ship. We now stock Mango Butter, Hemp, Olive Oil, Avocado Oil, Goat's Milk, Shea Butter, Clear and White bases in 2-pound scored blocks. We are also having a couple of new formulations done for us... I'll keep you posted on those at a later date.


Meet Missy.... she wouldn't let me take a picture of her face. She said she was too sweaty and it wouldn't be a complimentary photo. So instead, meet Missy's foot. The foot that bears the tattoo that I sooooo didn't want her to get. It reads "FAITH". I know, I know...I'm not a tattoo person. You will note that she didn't listen to her boss and got it anyway. Missy has been with GoPlanet for 7 years now. She is finishing up her teaching degree this year and will be student teaching in the Fall. I'm going to miss her when she leaves. I fully expect Missy's future children to work for me. She's like family at this point. Just wanted you to meet one of the great workers we have here at GPE. BTW, Missy is adorable with beautiful red hair, lots of freckles and an infectious smile and laugh. I call her my "3rd" daughter!


Thursday, April 21, 2011

Customer Appreciation Day: Yippee!!

It's always such a pleasure to start the work day with an email that reads, "I just want to thank you for your outstanding customer service and products." It puts me in the mood for a "CUSTOMER APPRECIATION DAY". That's good news for all of you reading this post. Today, and today only, the following customer appreciation discounts are in place.


  • Spend $50 or more and receive $5 off *discount code YIPPEE5


  • Spend $100 or more and receive $15 off *discount code YIPPEE15


  • Spend $200 or more and receive $30 off *discunt code YIPPEE30

    And, did I mention this is over and above the instant reward points you receive through the shopping cart. How about that?

Now for the Little Print:
Customers, discount will not be honored on orders placed before or after sale or if you do not enter the coupon code during check-out. Ends 11:59 pm ET, April 21, 2011.


Monday, April 18, 2011

Springtime in Michigan


Yesser reedee dee! That is white stuff on the ground in mid-April. Hope the Easter Bunny has a snowsuit and gloves, cuz he/she is gonna need them! Only in Michigan. Expecting about 2 inches today. This just isn't right!


Sunday, April 17, 2011

Vanillin: The Final Test Results


After several weeks of waiting to see how the melt & pours soaps would react to various vanillin percentages, the final results are in. Quite honestly, the soaps look pretty much the same as they did 11 days ago when I did my first testing review. As you can see in the above picture, the non-darkening vanilla had poor results. (L) is the non-darkening vanilla fragrance in clear soap base. It was was originally colored in our Neon Bright Blue liquid gel color. At this point the color has become completely "opaque" and darkened to an almost navy color. (R) soap was a white base that was scented and colored the same. It, too, has darkened and the color has changed substantially.

The picture below really tells the story of how much the color has changed. Soap on the (R) is the original color. As you can see, there is a major color difference several weeks later. At this point, I am fairly certain that we will be discontinuing the Non-Darkening Vanilla fragrance oil. You will understand this decision even more when you see how the Vanilla fragrance oil compares in the test results. Also, the longer the Non-Darkening Vanilla soaps sat on the shelf, I began to note a slight"off" smell to the scent.


Pictured below are the test results of the vanilla fragrance oil in both white and clear soap base. It scored well in my opinion. There were no brown spots and only a slight change from the original blue color (the clear base seemed to darken slightly more). The fragrance held well.

The soaps with vanilla fragrance and mixed with vanilla stabilizer were uncolored (below). As you can see the white soap base has turned a light eggshell color. The clear soap base has remained fairly transparent. I gave this a thumbs up and believe the vanilla stabilizer does help prevent brown spots and color change is minimal.


The biggest surprise for me was how well our Peppermint Fragrance tested. It has a 10% vanillin content and the soaps and the blue colors never changed. Peppermint scent remained stable as well. The Butt Naked (with a 5/8% vanillin content) did have a very slight color change. I found that odd since it had a lower vanillin content than the peppermint fragrance.

Bottom line is you need to test your soap base with your fragrance selection every time. Keep a soaping diary on what works and what doesn't. Taking pictures of your test results is also helpful. Once our new GPE soap bases are in stock (should be very soon!), I will be testing them as well to see how they fair with many of our fragrance oils and especially those with higher vanillin content. The raw ingredients in soap bases can also affect how well certain fragrance oils perform. Again, this is why you will want to keep accurate records and test in small batches.


Friday, April 15, 2011

Life is Good, and Free Stuff Makes it Even Better!


It's been a looooonnnng week for me and I'm feeling like a FREE FRIDAY is in order. Yep, I'm giving away some "free" stuff to 7 lucky people. Why seven? Because there are seven days in the week and like I said this has been a loooonnnng week ;)

So what's the free stuff and how can you get it?


TO BE ELIGIBLE:

Place a minimum order of $25 or more (in product) through GoPlanetEarth's online shopping cart. Order must be received today AND MUST INCLUDE the following in the comment section at checkout: FREE FRIDAY FOR ME

The first seven orders we receive that have this in the comment section get the "free stuff". BTW, all orders are date stamped by the server, so there is no guessing on our part about the winners. We have already randomly assigned numbers to each "free" item. If you are the first winning order then you receive "free item #1, third order will receive "free item #3 and so on.

So what's the free stuff?


FREE STUFF:

Can't promise who will get what, but these are the items I'm donating to Free Friday.


  • 2-lb. block of melt & pour soap base (I'll let you be surprised about what I pick!)

  • 4 ounce bottle of fragrance oil (hmmm... what one should I pick?)

  • Mold Market soaping apron (I do believe that one of the apron pockets holds an added surprise.... wonder what it is?)

  • Five dollars off your Free Friday order (we will apply when winner is determined)

  • Up to, but not to exceed, $10 off the shipping rate shown at checkout (UPS ground ONLY)

  • Pebble Rock Soap Mold from Mold Market ($7.75 value)

  • 2-ounce bottle of soap colorant (for use with CP or MP soap)

So there you have it! Winners will be notified by email and your first name/state will be posted on our company's FB page which, BTW, you can "like" and be notified of other coupon/free/discount offers. HAPPY FRIDAY ALL!!

Saturday, April 09, 2011

Bubble Wrap! Oh, What Fun...

It was a long, hectic, crazy week for all of us. On Friday afternoon we got a bit goofy. We had a delivery that included an incredible amount of "large" bubble wrap. By "large", I mean the bubbles on the wrap were BIG. We usually recycle the wrap... not today. It was an all out Bubble Wrap War to see who could pop the fastest and get the loudest bubble snaps. Yes, I am ashamed to say, this is what we were doing while packing your orders on Friday...BUT, we were still VERY attentive to processing your orders.

Kristy and Chelsea had a great time stomping on and finger crunching the wrap. It sounded like little firecrackers going off. Friday work days should have a "little" fun thrown into the mix, don't ya think?

Wednesday, April 06, 2011

Update on Vanillin Fragrance Testing

Bet you thought I had forgotten my promise to update you on our Vanillin testing? Not to fail. Here are some updates after 5 days. Soaps were poured on Friday afternoon (April 1).

Here are the results as of this morning at 10 AM (April 6). In photo #1 (four soaps shown above): The soaps on the left were colored with our bright neon blue liquid gel colorant and scented with Butt Naked fragrance oil. I selected Butt Naked because it has a 5.8% vanillin content. I tried to get a good mix on the percentage of vanillin in the fragrances tested. The soaps to the right (that look darker) were colored exactly the same as the soaps to the left. However, they were scented with non-darkening vanilla which has a 1.95% vanillin content. Oddly enough, it turned the soap much darker . There are no brown spots on any of the soaps to date but I want to let them all set for another couple of weeks to see what happens.

In the above pic (two clear soaps): Soap to the left that looks darker was our extra clear soap scented with vanilla (17% vanillin content). Vanilla stabilizer was added. As you can see, the soap does not have any brown spots (yet, and maybe it won't!), but, it has darkened. The soap on the right is our extra clear with no fragrance added.

(PS: There is this annoying little round black spot on the lens of my camera. I can't get rid of it. Think it's time to buy a new one. You will see it on the soap to the right. Sorry! I've tried cleaning the lens and that spot still appears.)

In the above pic: Our GPE clear and GPE white base was colored with the neon bright blue liquid gel color and scented with vanilla fragrance oil. Amazingly, the colors have not changed or darkened. We will see what happens in the next two weeks.

My final observation is that the vanilla fragrance with vanilla stabilizer added helped to prevent brown spots and browning, but it does darken the soap. You can see this in the above pic. The GPE white soap base has definitely turned slightly darker as did the GPE clear.

I'll give you another update in a few weeks. At this point, I'm not so happy with the non-darkening vanilla and will have to consider whether it's a fragrance I want to continue to carry. One of the other fragrances tested was our Peppermint. It has a 10% vanillin content. I was quite surprised to see that there was no color change in either the white or clear colored soap base. It seems that if coloring your soap, you may not notice any darkening of the soap unless you use the "non-darkening" vanilla fragrance. It's puzzling to me why that would darken and the other scents had little or no color change. Odd! Life is full of mysteries.

Tuesday, April 05, 2011

Too Funny...Reading Glasses that Match Soap


I have reading glasses everywhere. If I had to guess, I have about 40 pair here, there and everywhere. I received a new pair today (yes, call it an addiction!). I cracked up when I saw the color. How funny that they match the new soap I poured last night.

Melt & Pour Soap Making: Loaf Soap on the Fly...

This isn't the best soap making project I've done, but it was on the fly at 9 PM at night. I had to quickly test our new mango butter, goat's milk and shea butter soap base formulations. I need our lab to get these into production, but it was critical that I tested the bases before finalizing the formula.

I love my color choices for this loaf, but I was in such a rush to get to bed that I didn't take time to work through the amounts of colored base needed for each layer. Plus, I was in a hurry to pour each layer. Not a good plan and needless to say, the whole "in my mind" concept of the finished loaf didn't happen. I will be using this same color scheme in the very near future and taking MORE TIME to produce the loaf soap I really wanted.

Even though it's not the loaf slice I envisioned, the good news is all the soap bases got a thumbs up. It's a go and I've given our lab "heads-up" on moving forward with production. Hoping to have the 3 new soap bases in stock by month's end.

Sunday, April 03, 2011

Lifestyle: Eating for Weight Loss

With age, comes weight gain. At least for most of us. Weight gain was never an issue for me until I hit those "golden years". Since my trip to Chile in early February, I have been on a mission to lose weight. But I wanted to lose weight with a "lifestyle" eating plan. Forget all those fad diets that promise the world but never deliver long-term results.

Well, my eating plan has worked. I have lost 21 pounds with hopes of losing 5 more pounds. I feel great, look great, and fit into 5 garbage bags of "skinny" clothes that I had stored in the attic. What a joy to try on all those clothes (some even had price tags on them) for a new wardrobe without spending a nickel.

I have posted a couple of my favorite EZ lunch menus. Chicken salad with apples, grapes, and cucumbers. Yummy. PLUS, the grilled pineapples with cinnamon/vanilla yogurt curbs the sweet tooth. Thanks to Hungry-girl.com for her 300 under 300 cook book. It's awesome. 300 recipes under 300 calories. This chicken salad (3/4 cup) is only 285 calories. The two grilled pineapple slices with dip... just 25 calories.


I whipped up this Bean There salad for lunches this week. One cup=122 calories. Can't beat that! If you're on a slippery slope to weight loss, I encourage you to take a look at the hungry-girl.com website. My "lifestyle" eating plan includes 5 small meals a day. Almost no sugar, very lean meats and plenty of veggies. Skipping meals is a no-no for me. You can't burn fat if you aren't feeding the body.

If you are battling the bulge, don't give up! I never thought I could lose the weight. It's all about portion control and eliminating the snacking. Make it a lifestyle instead of a diet plan. I need to stay healthy for my grand kids, for myself, and for my honey-man. I still have plenty of years left in me. I want to enjoy them in "skinny" clothes :))

New Spring GPE Designer Soap Templates

We have just released 20 new "Spring Designs" that include a template for many of the basic Mold Market Soap molds. Or, you can create your own templates. This "for purchase" design template is for use with both our GPE printable soap paper and water dissolving paper.


Melt & Pour Soap Making: Spring Fusion Loaf Soap Kit

I love the colors used in this loaf. I selected these colors based on a striped fabric I noted while picking out material for a window valance. I knew this color combo would make a great loaf soap. And guess what? It did!

Sophie Soap Chic whipped up this loaf over the weekend. Here is what you'll need to duplicate this loaf (which by the way yielded eight 5-ounce soap slices). The loaf ends were trimmed slightly to give nice straight edges.

Light Green/Dark Green:

16 ounces clear plus 10% white base added. Melt and divide in half. Color one half with lime green liquid gel color plus a few drops of neon yellow and neon green liquid gel. You will have to "eyeball" the color until the right shade is achieved.

Color the other half of melted soap with neon green liquid gel and a few drops of kelly green and lime green liquid gels. Again, you will have to work with the colors until you get the right shade. A cheese planer was used to make the soap curls. You can find this in the kitchen section of any chain discount store. NOTE: We will be stocking the cheese planers by month's end :)

Lavender:

16 ounces clear and 1.6 ounces white soap base colored with lavender liquid gel colorant.

Blue:

16 ounce clears and 1.6 ounces white soap base colored with neon blue liquid gel colorant.

Black:

8 ounces clear colored with black oxide liquid gel colorant.

You will need the Mold Market Square Loaf and fragrance. Our bundled kit sold below includes Bamboo & Citrus (one of my MOST favorites) fragrance oils. If you need help learning how to pour soap in layers, view my tutorial on "Pouring Soap in Layers-Part 1" and "Pouring Soap in Layers-Part 2". These tutorials will provide you with the basic info needed for this loaf soap project.


TIP: When applying the soap curls to the top of the loaf make sure to pour a thin layer of clear soap base on top of the blue colored soap. Spritz the blue layer liberally with rubbing alcohol and then pour a thin (unscented) layer of clear. Immediately drop and arrange your green colored soap curls onto the clear soap layer. This will keep them in place. You can also let the blue layer of soap to set up slightly (let it form a thin soap skin) and then arrange some of the green soap curls on top. Let the blue layer set up a bit longer and the pour the clear layer of soap and apply the balance of the green curls.


Purchase Bundled Kit

Purchase this entire project in a bundled kit (you can add & remove items as needed). You may already have some of the ingredients. If so, just delete those from the bundle before making the purchase. You will have plenty of color and some leftover soap base that you can use for future soaping projects. A little bit of color goes a long way which means you can use these colors for dozens of other soaping projects.


Saturday, April 02, 2011

A Soaping Weekend Intensive

Cup of Jo Coffee Soap Wow! We've been busy this weekend making soap. Sophie Soap Chic was home from University and we made the most of her time. I worked late on Friday making the above "Cup of Jo" soap. It is scented with GPE's Java Jolt and Cinnamon buns. I have a tutorial in the works and should have it posted within the week. The Mold Market Rounded Loaf was used for this soap.

Receive a "Cup of Jo" soap slice. We are giving away 5 soap slices (offer valid only within the continental US). Email your first/last name, city/state along with a random number between 1-100. We have preselected five numbers. The five entries that are nearest to our selected numbers will receive a loaf slice by mail. Entries must be received by April 4 midnight ET.

What's not to love about this "Spring Fusion" loaf slice. A little bit of green grass fused to blue sky and lavender. It's scented in Blue Twilight. Look for a future post on how to recreate this loaf. It was made with the Mold Market Square Loaf.

GPE Printable Soap Paper: An Oops!

Just so you know, just like you, we have oops soaping moments. This is one of them. Sophie Soap Chic was working with our GPE Printable Paper. I gave her the instruction from our tutorial to follow. The instructions state "warm" water should be used when removing the paper backing. Sophie had her water a little "too" warm (actually it was pretty hot) and this is what happened.

When the water is too hot, the paper immediately curls up once the paper backing slides off. When you try to straighten it out, it tears. Just be sure your water temp is more of a room temperature when you soak your
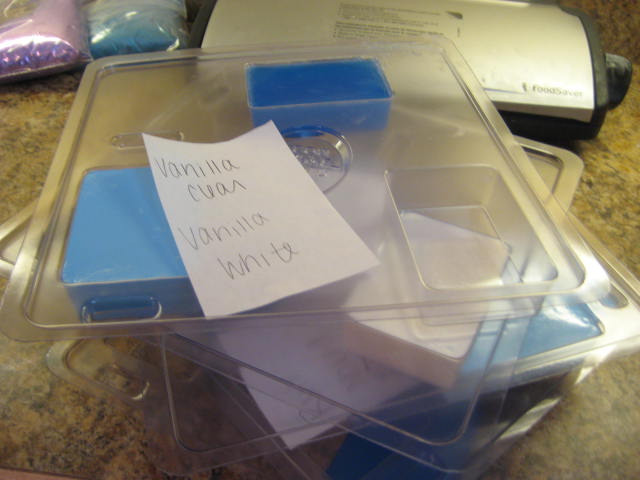
 GPE paper for application.

Friday, April 01, 2011

The Proof is in the Pudding... Oh, I Mean Soap!

The true value true value or quality of something can only be judged when it's put to use. That's exactly what we have been doing today with our vanilla color stabilizer. We have been testing it with our Vanilla Fragrance oil (FO) to determine how much it helps to keep away those dreaded brown spots in melt and pour soap base.


We are testing not only the Vanilla Stabilizer, but also several FO's that have high vanillin content. We will need a few days to chart our results. The fragrance oils tested today are Butt Naked (5.8% vanillin content), Vanilla (17% vanillin content), Vanilla Non-darkening (1.95% vanillin content) and Peppermint (10% vanillin content). We are using both white and clear bases. We'll keep you updated on our test results.

3-D Soap Revisited: Mold Market's Oval Leaf Mold

The Finished Product! A 3-D Oval Bar with leaf imprint. A perfect mold for making "Soap on the Rope".

We have a tutorial posted on our web site for using this 3-D Mold Market mold. It's a tutorial worthy of revisiting as this mold produces an outstanding, professional looking soap. Once the mold is cut into two pieces, it's a piece of cake to make this soap. The prep work is in cutting the mold. I used scissors to cut around the mold cavities and a small hand hacksaw to cut the opening for the pouring channel (you can purchase a small hacksaw at places like Home Depot or Lowes). It took me about 5 minutes to prep the mold.

Align the two halves and secure with either our soap clips, or binder clips. I elected to use binder clips this time just to see how well they worked. For the record, they worked like a charm. Position your mold in an upright position and slowly pour your soap base into the mold channel. I poured at around 135 degrees. There was little or no seepage around the edges of the mold when pouring at that temperature.

Allow the soap to set-up until firm and then remove soap clips. Gently pull apart the mold halves allowing air to come between the mold and soap. Once that happens, the two halves will separate very easily.

Using a kitchen knife or paring knife (not a table knife, you need something relatively sharp) trim any excess soap from around the edges. A vegetable peeler will also work for the trimming the edges. Cut off and trim the pour spout. And there you have it, a 3-D soap bar. You can easily add some cording to create a "soap on the rope". After pouring the soap into the mold, insert a piece of cording (fold the cord in half to make a loop) and insert into the mold. Use a mold or binder clip to keep the cording from sinking into the mold. Cording can be purchased at fabric stores. Cut the cord to desired length and then use a lighter to singe the ends (so they don't fray).