Sunday, March 31, 2013

The "Are We Almost There?" Road Trip


“How long until we get there?”  This single question must be built into the DNA of every child, because there is likely not a parent in the world whose kids haven’t uttered these words on a short or long road trip. My daughter was planning a 10 hour road trip with her three kids over Easter break.  Heck, you can’t even take a 30 minute car ride with the kids without someone asking, “Are we there yet, or how much longer?”

I knew intervention was needed to keep my daughter from having an epic melt-down when the kids started with the, “Are we there yet? Are we there yet? Arewethereyetarewethereyetarewethereyet?!!!!  I had a plan; a good plan I might add, a plan of all plans, an ‘are we there yet’ road trip plan.
 

I printed out a picture of a mini-van and road signs. Each picture has a front and a back side so mommy doesn’t have to hear, “Not fair, I can’t see the picture.” And we all know that NEVER happens! Cut out mini-van and the signs. Double sided tape worked like a charm in securing the front and back sides together.
 
A small hole punch and grommet pliers were used to create an opening at the top of each sign. This opening is where the paper clips are inserted to secure the signs and car to the string.
Here's how it works. All the cut-out signs will be attached to a string using paperclips. One end of the string is attached to the van's sun visor or mirror; the other end is tied to something in the back of the van. 
When the road trip begins, the mini-van graphic is parked at the start line. Every 45 minutes into the trip, the kids get to move the mini-van up to the next road sign.
The kids rotate turns to avoid any fighting over who gets to move the van. Since this is a 10 hour trip, I placed 13 road signs on the string along with a start and finish graphic.


Each time the van moves forward, the road sign is removed from the string and placed behind the mini-van. When the vehicle reaches the finish line (AKA destination), all the signs will be positioned behind the van.
There are countless variations to this road trip idea. If you're traveling to Disney World, make graphics of Disney characters. Use graphics of different States, license plates, historical landmarks.
 
 
When you are done with the game, simply wrap the string around a 4 x 3 inch piece of cardboard (to keep it from getting tangled) and store in the glove box for future use.

I will be using this same idea at Easter to tell the story of Christ's death and resurrection to my grandkids. The timeline will start at the Last Supper and progress to the cross, the tomb, and finish with the resurrection. The kids will enjoy moving Jesus along the timeline as the Easter story is read. Visual props breathe life into a story.

If you would like to recreate my Are We Almost There road trip you can download the graphics here.  

Wednesday, March 20, 2013

Easter Egg Geodes


Photo credits: Nana Jones at Craftknowitall


I am always looking for weekend projects to do with the grandkids. I spotted these beautiful geodes eggs made by Nana Jones over at Craft Know It All. These are jaw-dropping gorgeous and something the kids can do on Friday night and see the results the next day.

The biggest decision will be choosing what colors to use. Color choices are limited to one per grandkid and NeeNee will pick the fourth color. I'm fairly certain that Olivia will pick pink, the two boys will likely choose green and blue. My choice will be yellow.

Last week my little buddy, Fischer helped me prep the eggs. We had to wait for the alum powder to arrive by mail so we are going to finish up the geode project this weekend. If all goes well, we will have beautiful crystal eggs like Nana Jones to dress our dinner table on Easter.


The first step is to blow out the inside of the egg. I straighten one end of a large paper clip to poke holes in both ends of the egg. You will want one hole a little larger so the yolk and egg white can escape.
 
I gave my nine-year old grandson the egg blowing duty. He thought it was pretty cool, and trust me, he has much more wind power than NeeNee.

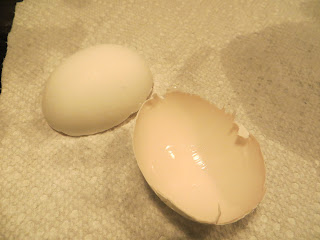
Once the eggs were cleaned out, I inserted the tip of scissors into the larger hole and cut through the center of each egg to create two halves.


Clean the inside of the egg halves and turn the hollow side down and allow to dry.

Once dry, place a dollop of white glue (I used the Elmer's brand) in the center of each egg. Use your finger or a craft paint brush and thoroughly coat the inside of each egg with the glue.

Sprinkle a layer of alum powder over the glue, covering all areas. Set the eggs aside.

This is the point my little buddy and I stopped our project. We didn't have enough alum powder to make the solution to grow the geodes.

But, the alum came today! So..... this weekend, we will be putting our prepped eggs into the colored solutions and see what happens.

I'm going to very disappointed if this doesn't work, and so will the grandkids. With fingers crossed I am hoping they turned out as nice as Nana's.

Alum Powder


My little Buddy, Fisher applying the alum powder to the eggs. He was such a good helper.


Here's a video clip of Fischer helping with the eggs. We'll keep you posted on how the geodes turn out.


Sunday, March 17, 2013

Melt & Pour Alien Soaps


Melt and pour alien soaps

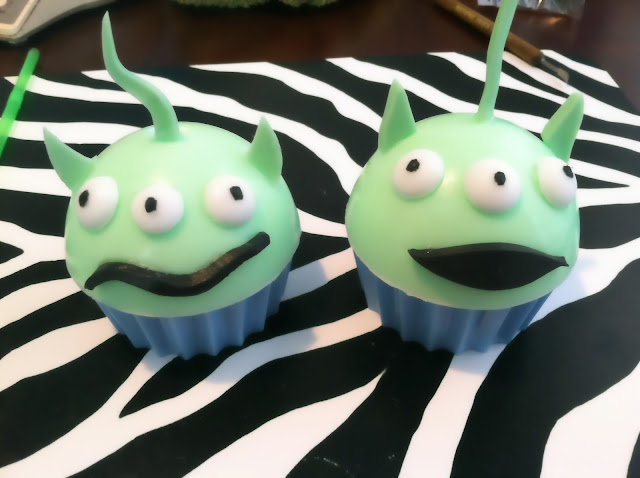
There was an invasion of little aliens in the soaping kitchen last week. This soap is made from Mold Market's original cupcake mold and large bath bomb mold. The antennas and mouth are hand cut using our recessed smoothing tool. The center cherry on the cupcake mold makes for the bulging eyes. All the pieces were assembled using clear melted soap base.

Pictured left are cut-outs of the ears and antennas. Pour a thin layer of soap into a flexible jelly roll pan. Allow soap to set up and then remove to a cutting board.

Our cupcake cello bags work best for these little guys. The bag  allows enough room for the taller antenna.

The base of the soap is poured in white soap that is colored with 2 drops of bright neon blue liquid gel and 1 drop of black oxide liquid gel.


The head is the poured in white soap base (about 6.8 ounces) with 2 drops of bright neon green liquid gel.

For the bulging eyeballs, use a soap injector tool and fill the center of the cherry in the cupcake mold. Attach the black pupils with scrap soap left-over from the mouth cut-outs.

Color white soap with 2 drops Kelly green and 1 drop bright neon green liquid gels. Pour a thin layer into the bottom of the flexible jelly roll pan. This is used to make the ears and antennas.

Do the same for the mouth except color clear soap black. If you try to color white soap, you will get a gray color. You need to use clear soap to achieve black. You can make the mouths any expression you want.


It's a good idea to score the cupcake base and head with a knife of molding tool. This helps the clear soap base seep into the scored areas for better adhesion. Use melted clear soap just like you would glue to secure all the pieces. The longest part of this soap project is carving the mouths and ear cut-outs.


Happy St. Patrick's Day


My grandkids are always excited about special holidays because NeeNee dresses the table with fun and colorful place settings. This is their place setting for St. Patrick's day.


After lunch, we will playing a Shamrock dice game. Well, it was going to be a dice game until four-year old Fischer misplaced the die. We will using the spinner from the game Chutes and Ladders instead. Those green bills are what they will be getting if they win. You will find the printable shamrock templete here.

How to play Lucky Shamrock:

The object is to color in all the numbers on the shamrock. Each person rolls the die and crosses off that number on the shamrock. If you roll a number that you no longer have, you pass the die to the next player. First person to color in all their numbers wins.


Happy St. Patrick's Day. May luck be on your side!

Thursday, March 14, 2013

Melt & Pour Soap: Sophie's Easter Chicks


Welcome back, Sophie! Many of you may remember Sophie Soap Chick. She worked for GoPlanetearth for a number of years and is now finishing her Criminal Justice degree. On a whim, I contacted her to see if she would be willing to go to work on some soaping ideas I've had on the back burner. She answered with a big YES!!

I filled a big box with soaping supplies and sent them off to our soaping gal. This soap is her comeback soap and appropriately named it "Sophie Soap Chick".


Supplies Needed (makes two chicks)

Cube and melt the white soap in the microwave in short bursts of heat. Add the yellow colorant  (about 4 drops) and 2 teaspoons fragrance oil. Mix well and pour into the bath bomb mold cavities. Reserve the left-over yellow soap. This will be used for the exterior covering of the chick (feathers).


Add a small drop of orange color to the leftover yellow soap. Reheat in the microwave until pourable. Don't overheat! Pour soap soap into the 8 x 8" flexible jelly roll pan. Let it set up completely. Remove from pan grate like cheese.


To make the feet and beak, melt 2 ounces of white soap in the microwave. Color with a couple drops of orange colorant. Pour the soap into the lid of a small plastic storage container. The 8 x 8" pan will be much too large. Let the soap set up and remove onto a cutting board. Use the recessed molding tool to hand cut the feet and beak. Sophie even included a template for the feet.

The eyes were made by drawing melted white soap into the injector tool. Let the soap set for about 90 seconds after removing from the microwave. Draw the soap into the syringe and squirt out soap dollops. Rinse the syringe.

Melt the clear soap base in the microwave. Reserve a very tiny portion to make the blacks of the eyes. Leave the rest of soap clear. You can add fragrance, but it's optional.


Join the two bath bomb halves with melted clear soap base. Make sure you have a nice, tight seal. Once the halves are set, start applying the shredded yellow feathers. This requires a little patience. Spoon melted soap onto the sphere and then apply the shredded soap. It will take several applications to completely cover the chick's body. Let dry.

Use melted clear soap to attach the feet, beak and eyes. The little chick weighs in at around 7.5 ounces.


Monday, March 11, 2013

St. Patrick's Day: Bite Size Cookies


Yesterday, I decided to get a jump start on making cookies for the grandkids' classroom party on Friday. It's tradition that NeeNee bring cookies, green lime-aid and treat bags for each student. And of course, green napkins and cups.

My husband returned from the grocery store with the ready made sugar cookie dough. I was expecting the dough to be in one of those sliceable rolls. Instead, in came in break-apart cubes. It's probably nothing new to most of you, but for a non-baker, it was a novel concept.

Now, what should I use to make a shamrock on these little bite-size cookies. Ah, ha, said the women who never bakes, "I can cut a stencil from the lid of my husband's to-go wonton soup container."

My shamrock application improved with every cookie. By the last batch, I had mastered the template.

Beaming with pride, I showcased the cookies to my husband. His reply, "I could have purchased ready-made cookies, all decorated, at the grocery store" as he popped a cookie into his mouth.

My response,  "Come here so I can knock you to the other side of the moon and don't come back without that cookie you just ate." Big hugs ensued as he told me the cookies looked great.

These are the cookie cubes. It was amazing how they turned into round cookies.

While making the cookies, I thinking soap. It's my business and in my blood. Hmm... how can I make this template work on finished soap.

Let's see... if using cake frosting on cookies, why not use soap frosting on soaps? BINGO! It's on this week's soaping projects list.

I think Mold Market's personal size cirle would be ideal.


96 cookies baked, 80 treat bags assembled...big sigh! Was it worth the time, energy and expense? YES, YES, YES! To look at the grandkids' faces as they pass out treat bags and cookies to school friends, I would do it again in a heartbeat.


Sunday, March 10, 2013

A New Tradition: Prayer Bears


This Easter my grandkids are starting a new tradition. After Easter service, we are going to a local Caretel facility to visit with nursing home residents. The kids are taking a dozen or so of these Prayer Bears to gift to those they visit.

I am replacing the cards that came with the bears with a personalized prayer card that includes a photo of the grandkids and a message that reads, "Whenever you are lonely, sad, or sick. We are praying for you."

If the facility allows, I will take a photo of the Prayer Bear recipients. The grandkids will have a matching Prayer Bear for each one they gift.

The matching bears will have a photo with the resident's name and photo. At bedtime, we will prayer for each of our Prayer Bear friends.

Teaching our children a culture of sharing starts in the home. I want my grandchildren to understand that those perceived as a burden (such as the elderly) can be our greatest blessing.

How to Make a Money Card with Handmade Paper


Today, my daughter, Jamie, celebrates her birthday. Last night her husband and friends rented a party bus to take them to the 80's Show. Before they left,  I gifted Jamie with this money card (to help cover drinks) and a personal birthday letter.


I made the card using misc items I had around the house. Of course, I tend to have just about everything per my grand kids.

The letter to my daughter was printed on a handmade paper bronze colored paper. The edges were trimmed with a scrap booking punch.

I used two sheets of GoPlanet's handmade natural weave paper. The sheets were joined using double-sided tape and then folded toward the front and kept closed with ribbon. Use a small hole punch to make the openings for the ribbon.

I used a skewer to punch the holes for remaining ribbon. For a little bling, I brushed a paper heart doily with gold mica powder. Poke holes in the heart that align with the centerfold of the paper. Thread the same ribbon used for the center of paper through the heart. Fold money into fan shape and attach to the middle of the heart using the ribbon.

GoPlanetEarth offers a nice selection of handmade papers. They can be used for cards, soap bands or scrap booking projects.


Saturday, March 09, 2013

Fish Soap on the Rope


I had to pour up some color samples for a customer. I elected to use Mold Market's Willie the Whale mold. This mold depicts a fish and since my grandson is named Fischer (we call him Fish), it was an ideal pairing. He got a kick out of  hanging the soaps in NeeNee and Poppy's shower.

You can also successfully use Mold Market's Homer the Fish mold.


I used a straw/spoon combo to punch the hole for the string. The grand kids use these straws for Root Beer floats and they are more durable than a standard straw.


Thread twine through the opening and knot. Fischer hung his soap from a hook in the shower.


These whales are ideal for birthday party favors. Shrink or stretch wrap the soap part and tuck inside gift bags along with other ocean themed favors. GoPlanetEarth's 4 x 6 inch shrink bags will fit this whale mold.

Tye Dye Milk Art


I spent some one-on-one time with my nine-year old granson. He loves science and art and our Saturday morning project incorporated both.


We started by pouring milk onto a large plate. Make sure the plate is able to contain the liquid. Next, a dropper was used to disperse assorted food grade colorant on to the milk.

Make sure you rinse the dropper between each color. We used approximately 8-10 drops of each color (pink, red, orange, yellow, green, blue).

The next step is to place a few drops of dish soap in the center of the plate. The blue color Dawn dish soap worked well.

As you can see, the application of dish soap immediately caused the colors to explode into a tie-dye pattern.


Another few drops of dish soap caused even more color explosion. You can swirl the colors with a toothpick or wooden skewer to create awesome color displays.

Don't over mix the colors or you'll end up with a muddy looking color. Once you achieve the perfect mix, snap photos that you can later edit in a photo editing program.

My grandson and I used MS Publisher and resized the photo to fit onto 8 1/2 x 11" white card stock. This was a birthday card, so we added block text lettering and scored the card for folding.


My grandson, Carson, was delighted with the final look of his card. The best part was knowing it was a card he created himself. He will have great pride in presenting to Grandma Mike on his birthday.

This entire project took less than 30 minutes. Don't underestimate the power of spending time with your kids or grand kids. This half  hour was a time of bonding with my grand son while creating something uniquely his own.
 

The food-grade colorants can be purchased at GoPlanetEarth. We offer colors not readily available at your local food market.

Carson hand-printed his message inside the card and will give to his Grandpa Mike tonight at dinner.