 Today I tested the new Mold Market 3-D Oval Leaf mold. It went very well. Cutting the two mold halves was easy to do with scissors. If you have a paper cutter on hand, that would work well too. The two halves don't even need to be evenly cut. What does need to be exact is the alignment of the two halves.
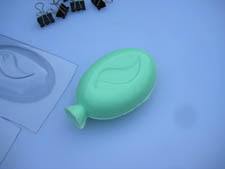
Once you've cut the two pieces from the sheet mold, align them and use binder clips to hold in place. I used medium size binder clips, but large clips would work equally well.
 You will want the pouring temp of your melt and pour soap to be relatively cool when pouring 3-D molds. You don't want to have the soap seep outside the mold edges. I use my pinkie finger as the gauge. If I can comfortably dip my pinkie finger into the melted soap base, then it's generally safe to pour into the mold.
Once the soap sets up, remove the binder clips. Carefully release the soap from each mold half. The next step will be to remove the pouring channel. This is easily done with a sharp kitchen knife. You will also want to clean up the soap edges. A vegetable peeler or a sharp kitchen knife are your best tools. A little liquid glycerine around the edges of the soap (use your fingers), will give a nice finished eged to the joined pieces.

No comments:
Post a Comment