
This is a copy of a recent article I have written. It was published in the Handcrafted Soap Making Guild, "The Journal", magazine. Hope you find it helpful (especially during this hectic holiday season)!
Many small business owners are hat collectors? Is that you? Ten tips for Shedding Hats in Your Business Life
How many hats are you wearing and what roles are you juggling in your business life? It’s a question many of us ponder especially those running a 24/7 online business. Even with the help of employees, business owners find themselves working long hours; sometimes six days a week (maybe even seven). And let’s not forget all those social media hats that online companies must now wear to stay on top of their game. At the end of the day, all those multi-layered hats can siphon our energy and cause us to operate in crisis mode. If you find that you are wearing too may hats, and experiencing a human energy crisis due to it, then it’s time to reevaluate your hat collection. It’s time for a human energy hat assessment. Let’s take a look at ten ways you can shed, discard or reassign hats to help empower you and keep you from being stretched like a rubber band.
1) Don’t let one single hat define you. Realize that you, and only you, have choices about your life. You decide how you will live your life, how you will respond to a crisis, and what you will allow to drain your energy. Prioritize your hats. Don’t let the hats make your choices.
2) Know when to shred a hat and move on. Determine how much energy you want to spend on a given issue. If you find you are expending too much energy, then remind yourself that this is all the energy you have for the moment and “let it go”. Take off the hat.
3) When faced with perplexing decisions or issues, take off the hat, and sleep on it. Always step back from the moment. Ask yourself “How important is this in the grand scheme of life?” You’ll be amazed at how much easier it is to see the big picture when you remove the hat overnight.
4) Have a combat hat on hand. Put on your combat hat whenever you need to enable detachment skills and handle confrontational situations. Example: If you’re wearing the hat of a customer service representative, you may need to switch to the combat hat from time to time. The customer service hat is service with a smile. The combat hat deflects negative energy of that occasional unhappy customer (and we all have them). So wear that combat helmet whenever necessary and protect your precious energy. Remember, emotions are energy driven and negative customer issues can zap your energy.
5) We can’t always control the fit, design or weight of our hats. Some fit, look and feel better than others. That’s OK. Life is full of all kinds, shapes, sizes and styles of hats. But in the end, you should only be wearing those hats that feel the most comfortable. You might be surprised at how many ill-fitting hats you can give away if you just ask.
6) There is no prize for wearing the most hats. Occasionally, you need to park those hats on a hat rack and discard those that don’t fit. If you don’t take stock of your many hats, you’re going to burn out physically, emotionally and mentally. Every time you say yes to a new hat, then delegate or discard a former hat.
7) Every 4-6 weeks remove all of your hats. Take a complete break from every business hat you wear and defrag your head. Shut down the computer; turn off your email and cell phone. You will be amazed at how life goes on (and your business as well) even when you aren’t wearing hats for a few days.
8) Occasionally, lift the brim of your hat. It could be obscuring your vision. If you lift the brim, you just might just discover that what you thought was important, is not. Wear the hats you love the most and then giveaway those hats that might better fit someone else.
9) Identify your core hat. Don’t spread yourself so thin that you are losing sight of your business mission. Assess and then refocus your activities on those things that bring the greatest sales within your marketplace. Determine the heart and soul of your business operation and downsize if necessary. Take off a hat or two.
10) Know when it is time to pass a hat on to additional staff. Labor is usually one of the more costly expense items in the budget, but, skimping on staff can impede the growth of a company. Don’t become a slave to your company. Many individuals start their own business to have more control over their time. But, while trying to grow the business, they become enslaved to the very thing they thought would afford them more freedom. They haven’t learned when it’s time to pass the hat.
Whether you are shedding a hat, giving it away, or retiring it to the garbage bin, here is the bottom line: Only wear those hats that help you stay on target with your business goals. If it means downsizing your product line, then do it. Maybe you are trying to target too many audiences. If that is the case, scale down and refocus your business plan to target a single audience. Scaling down your hat collection doesn’t represent failure. It simply means you have learned how to stop trading time for money. The mark of any good small business is embracing the goals of the business, not how many hats you can collect.
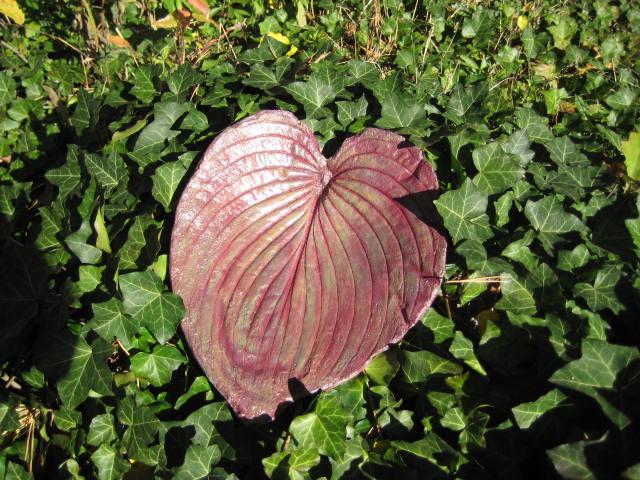
 My friend, Peg was kind enough to share her finshed artwork with me. I have been blogging about how to make hand-casted soap dishes using leaves. This particular piece of art goes a step beyond. This large bowl was hand-casted in concrete using "layers" of giant leaves (found in your garden or yard). You can make this same type of art using the recipe given in a prior post. Isn't Peg's paint job awesome?


 It was this


 Large leaves were then pressed into the bottom of the bowl (vein side down). The deeper the veins, the better the results.


 For those unfamiliar with a


 You need to pick your leaf. This is a leaf from one of my Yucca plants. Pick a leaf that has no holes (from insects) and is still fairly green. Many leaves are already turning brown due to the Autumn season. Those might not work so well. A leaf with pleny of veins is a perfect fit.
 My neighbor mixed up the concrete. I'll have the correct mixing ratio posted soon. Basically, you just mix water into the concrete until you get a consistency as shown. It's very similar to the same consistency you want when making fizzing bath bombs. You want to be able to squeeze the mixture until it feels and looks like wet sand.


 Our leaf is complete. Now we must let it dry for about 3 days. I will be posting an update on this project once the concrete dries and the leaf is removed. At that point, the painting process begins. Oh what fun! Tomorrow night I'll be meeting with a group of friends to form even more leaves. Tonight, I'll be peeling apples (from a local orchard) to make an apple crisp to share tomorrow with my crafty friends. I've posted that recipe. The Apple Crisp is easy and awesome tasting. Add a dollop of vanilla ice cream and you're good to go.


 I returned from a Chicago trip this past week. Besides spending an
  You make applesauce out of those life moments. You drop all those "ugly, bruised, can't do this any more, why did I ever think this would work, what was I thinking, why me" moments into a big pot and steam them until they are mush. It's really quite amazing how you come out with something entirely new. It is what I call life's applesauce. It's mixing a variety of different life events, circumstances and moments that have gone bad and incorporating them into life's mixing pot. You then put them all through a sieve,


