Sunday, August 12, 2012

Creating Memories

While getting ready for a dinner party, I scooted into my bedroom to pick out jewelry to complement my outfit. My costume jewelry is stored in various decorative containers. While removing the lid from one container I was surprised to find a blue cardboard box tucked inside. Taped to the box was a gold card with the name "Olivia"  and "14th" written in black marker. I was puzzled about the "14th" notation, but later realized this was the day my six-year old grand daughter, Olivia, safely stored her treasures in my jewelry box.


At my age, my memories at age six are greatly diminished. If I were completely honest, I can't remember them at all (except for my kindergarten teacher, Mrs. Blue, who wore sweater clips). Does anyone even remember sweater clips? Anyhow, back to my story.


I was curious about the contents of this special box. Obviously, the content must be of great importance for Olivia to replace my jewelry with her special blue box (still trying to find where she put my jewelry) . As I opened the box, her treasures were revealed. I wasn't quite prepared for what I found.


There were buttons, a plastic ring, a burned out light bulb, a rock, pull tab from an aluminum can, a jar top and chenille pom poms.

It was unclear to me why Olivia would save all these trinkets. Not only did she tuck them in a box, but proceeded to hide that box inside another box. What possible use was there for any of these items? What was her purpose in hiding these trinkets?

In pondering these questions, I reflected on the many "things" we collect in our lifetime. We're no different than six-year old Olivia. Our valued personal collection of trinkets and treasures are meaningless to most. Yet, we are often unwilling to let go of them. Why?

In looking at the items Olivia saved, I quickly realized each trinket represented something we had done together as a craft or as part of a designated special day. In her mind, each token trinket captured a moment she wanted to remember. I felt honored my grand daughter wanted to create a history of our time together.

So, until Olivia decides otherwise, her blue box memories will remain private, untouched and undisturbed and safely tucked inside my jewelry box.


Packaging Idea: Monster Cupcake Soaps


Remember those monster cupcake soaps Gabby made last week? Here's a cute packaging idea for gift giving. I selected two of the friendly guys and placed each in a clear cupcake box cushioned with colorful paper shred. Whimsical monsters were printed on white paper and applied to the outside of the boxes with double-sided tape.


Stack the two boxes and secure together with strips of double-sided tape. A hole punch was used to make openings for the ribbon handle. Thread the ribbon ends through the punched openings and knot ends to keep it in place. Since this was being gifted to an 8 year old girl, I decided to dress the top box with a package of colorful sour candies.

I hope this offers inspiration on ways to package cupcake soaps made with Mold Market's cupcake molds. For the record, this gift was very well received by 8-year old Chloe. She couldn't wait until bath time and the sour candies were gobbled up within minutes.

A picture of one of the cupcake monsters was inserted into the back side of the top box. If you are reselling the soaps, this is a great place to list ingredients.


Saturday, August 11, 2012

Glow in the Dark Cosmic Soaps


I love when a simple, basic mold grabs your attention. These cosmic ring soaps were poured into Mold Market's Rounded Oval mold. The mold cavities were tipped for each color pour. Allow each layer to set up until almost firm, spritz with alcohol and pour the next tilted layer.

The number of color combinations and layers are only left to your imagination. Both white and clear soap bases were used  in our examples. The red-black rings and black-yellow rings are poured in clear soap base and colored with black oxide, neon bright yellow and tomato red.


The green-white and black-white cosmic soaps used both white and clear soap base. Neon bright green colorant in clear base colored the green rings.

GoPlanet's glow-powder is ideal for these cosmic soaps. Add the powder to the melted soap and color as usual. The glow-powder works best with clear soap base. Use 1 teaspoon of glow powder to 1 pound of melted soap.

Friday, August 10, 2012

Melt & Pour Soap: Fortune Soap Roll Ups


Melt & Pour Soap: Fortune Soap Roll Ups

These roll-up soaps are simple and can be done in under one hour. Pour colored soap into a silicone jelly roll pan. You want a thin layer, about 3/8" to 1/4" thick. Eight ounces of soap will yield 8 roll-ups if using our 8 x 8" jelly roll pan. See the below pattern for how to cut the roll-ups.


We elected to use clear soap base colored with a variety of GoPlanet's Liquid Gel Jewel Tone and Metallic colors. Once the soaps are rolled into shape, lightly dust with powdered mica. We sell the perfect brushes for dusting the mica powders.

Melt & Pour Soap: Fortune Soap Roll Ups

Implanting the fortunes inside the roll-up is easy. Once soap is cut into a triangular shape, position a fortune in the middle of the triangle. Be sure the printed fortune is long enough to extend from one end of the soap (see below).


The user pulls out the fortune slip before using in the shower or bath. Consider using these as "one-use" soaps in the ladies room at a wedding reception. There are so many ways to present these lovely soap roll-ups. We would love to hear your ideas. Here is a PDF file (courtesy of GoPlanetEarth) that offers a collection of printable fortune inserts.

Melt & Pour Soap: Cupcake Soap Monsters


GoPlanetEarth.com Cupcake Monster Soaps

I just love when I throw out a soaping idea and one a worker runs with it. These cupcake monster soaps were made by Gabby using Mold Market's Original Cupcake mold. We were all brainstorming how to make feet for our friendly monsters. Thank you, Nichelle, for suggesting we use an economy heart mold. Gabby cut the heart in half to make the feet. Don't you love the shoelaces?

All the monsters were colored with our bright neon liquid gel colors. Clear soap was colored and used in cupcake the bases and toppers. Gabby hand cut the mouths, tongues, hair and horns.  Black oxide colorant was added to clear soap base for the shoes, mouth and pupils.


Melt & Pour Cupcake Monster Soaps
List of Supplies Used:

  • Clear melt & pour soap base- plan on 6 ounces for the cupcake portions and feet.
  • Set of neon bright colorants (contains six colors). The neon red is sold separately.
  • Mold Market's Original Cupcake mold
  • Black Oxide colorant (we used our liquid gel)
  • GoPlanet's Economy Heart8 mold
  • Mini cutter set (for hair and whites of eyes). Use a plastic to-go straw to punch out the black portion of eyes)
  • Recessed Smoother Soaping Tool (this is critical to have when cutting out the shapes for the monster's face).
  • Fragrance oil of your choice. You will need approximately 2 teaspoons of fragrance oil for three cupcake monsters. (there are 6 teaspoons in one ounce of fragrance oil)

All the monster pieces were attached with melted clear soap (no color added). The nose portion of the monster is part of the cupcake topper. Gabby poured that in a contrasting color. If you're wondering how to package these little guys, consider GoPlanet's clear cupcake boxes.


If you like this soaping project, please let Gabby know via email. She will appreciate your feedback.

Tuesday, August 07, 2012

Melt & Pour Soap Making: Wedding Soaps


GoPlanetEarth.com Water Dissolving Soap Paper

We finished up our final day of personalized wedding soaps for an upcoming event. They turned out awesome. Thanks to Gabby and Chelsea who learned the tricks of using the GPE water dissovling paper. Their first try wasn't quite as successful, so I'm posting a few tips they learned when using this paper in the molds.

  1. Our entire staff agreed a white soap background offers the best results.
  2. Pour a very thin layer of unscented ultimate clear soap in the bottom of each mold cavity. DO NOT spray with rubbing alcohol. If any air bubbles appear, use your finger to pop them.
  3. Allow the thin soap layer to set up completely. Once set, insert and center your pre-cut paper design/logo.
  4. Melt your white soap base and allow to cool to around 130 degrees. Add desired fragrance oil.
  5. Slowly fill the balance of the soap mold with the white soap.
  6. Spritz the back of the soaps with rubbing alcohol once poured to remove any surface air bubbles.
  7. Do not remove soaps from the mold until they have completely set-up.
The following Mold Market molds were used for this soaping project: #006 Beveled Oval Mold, #011 Beveled Border Circle and  #005 Beveled Border Square. The templates can be purchased here. The templates DO NOT include any printable GPE water dissolving paper. That is a separate purchase.


GoPlanetEarth.com Water Dissolving Soap Paper

Saturday, August 04, 2012

Shabby Chic Wedding Ideas


GoPlanetEarth.com Water Dissolving Soap Paper

I've attended my fair share of weddings this summer. There's one more wedding on the calendar for late August. This one is extra special for me. My former administrative assistant, Kaylee, is the bride . Besides planning a wedding and working part-time, she starts the U of M nursing program at the end of this month. She's one ambitious girl and I'm extremely proud of her.


GoPlanet's wedding gift to the bride and groom are reception table decorations. Thankfully, Kaylee is no "bridezilla"; so, it's been fun sorting through shabby chic decorating ideas. The final verdict: Painted wine bottles. A collection of assorted wine bottles filled with hydrangeas, Queen Annes' Lace, and other wild flowers will adorn the tables.


Our monogram soap text matches some of the wine bottles wedding labels.

In keeping with the theme, my staff made monogram soaps using GPE water dissolving paper.  GoPlanet offers templates for use with a number of Mold Market basic shape molds. These templates can also be used with GPE Printable Soap Paper.

Keep in mind the water dissolving paper disappears when introduced to water. The GPE Printable Paper has a vinyl type finish. It does not dissolve.

Instructions for Using Dissolving Soap Paper

1) Print your picture onto the water dissolving paper. We used a color laser printer. Make sure the laser printer is cool before printing each sheet. Otherwise, the paper may become stuck in the print roller.

2) Cut out each design to fit your mold.

3) Melt a small amount of Ultimate Clear soap base (do not add any scent!). Cool to 135 degrees and pour a thin layer into the mold cavity. Let the soap set up until firm.

4) Position the picture logo on top of the poured soap. VERY lightly spritz a layer of rubbing alcohol onto the back of the picture. You don't want the picture to start dissolving, so use discretion when spraying the alcohol.

5) Fill the remaining portion of the mold cavity with white soap base. For our project we used Mold Market # 011. Scent as desired. Pouring temp should be around 130 to 135 degrees. You don't want to melt the paper.

6) Let soap set up for several hours until firm enough to release from the molds. DO NOT put soap in the freezer. These soap types need to set up at room temperature.


Sunday, July 29, 2012

Melt & Pour Soap: Slider Burgers & Fries Tutorial

Melt & Pour Soap: Slider Burgers and Fries Tutorial

OK, Maria... this post on "how-to" to make the slider Burgers & Fries soap is for you. Below are the notes we have on file.

BURGER BUN
MEAT
CHEESE
  • Clear soap colored with Flower Child Yellow Submarine color
  • Partially fill the square cavity of the basic shape mold
TOMATO
  • Clear soap colored with neon red
  • Partially fill the round cavity of the basic shape mold
LETTUCE
  • There are a couple of options. You can use clear soap and color it with neon green and Groovy Green flower child colors (mix to desired color). Or, you can use clear soap, add a small amount (about 10%) of white soap base. The addition of the white base will help soften the green color for a more "lettuce-like" color.
  • Partially fill the square cavity of the basic shape mold
FRIES
  • Clear soap with a small amount of white base added. Color with yellow oxide (very small amount) and Flower Child Yellow Submarine colorant. You will have to eyeball the color. Start with small amounts of color, a drop or two, until desired color is achieved.
  • Use wavy soap cutter to cut the fries.
  • Pour colored soap into a jelly roll pan. Let soap set up, then cut fries to size.
ASSEMBLY
  • Melt clear soap base and drizzle between each layer of the burger. The soap will harden and keep the burger layers in place.
  • Want ketchup with your fries. No problem. Melt clear soap and add a small amount of tomato red. Pour soap into a condiment cup.


Thursday, July 26, 2012

Melt & Pour: Summer Soap Camp

Granola Bar Melt & Pour Soaps

Every summer I have a few workers graduating from college. It's both joyful and sad as they move forward in their career path. We are like a family at GoPlanet, so when someone leaves us, there are tears. As we wipe the tears, we welcome our new replacement workers into the fold.

Part of their initiation rite is learning to make soap. We call it our Summer Soap Camp. I'm a firm believer employees must be equipped with knowledge to provide great service. Summer Soap Camp helps acquaint new workers with the business they represent.


Day One: Basic soap making techniques are demonstrated. This includes how to melt, color and scent melt and pour soap. Opacity is discussed and how it affects color outcome.

Day Two & Three: Three easy dual pour projects using Mold Market's Soft Serve Ice Cream mold (#239), Funky Flower (#267) mold and Button mold (#265). Pouring dual colors, monitoring pouring temps, demonstration on injector soap tool and importance of using rubbing alcohol to promote adhesion.


Day Four: More complex use of the injector tool for beginning soap makers. This included pouring a grape cluster soap. An introduction to pouring loaf soaps with embeds was also on the agenda.


Our GoPlanetEarth newbies had no problem grasping the techniques presented at each session. Everyone showed great enthusiasm and caught on easily to multiple color pours. At the end of day four, they were hooked on soaping.

Day Five: This was the final session allowed everyone to "create your own" soap. Two soaps that stood out were the granola bars and embedded loaf. These were rather advanced soaping projects for beginners, but the outcome was awesome.

Gabby's loaf mold was a partial success. It was a learning curve in the importance of pouring layers at the right temperature to ensure the each layer adheres. When the loaf was released from the mold and sliced, several slices separated.

I was impressed that she carefully monitored her pouring temps and none of the embeds had a melt-down. That alone is quite an accomplishment.


Chelsea's granola bars were quite impressive. I will be posting a future tutorial on how to make these yummy smelling bars.


It's been a fun week training staff. The excitment displayed when the finished soap is released from the mold reminds me why I love this business.

Wednesday, July 18, 2012

Coloring Queen Anne's Lace Flowers


How to Color Queen Anne's Lace Flowers

The whole state of Michigan, as well as 60% of the US, is suffering extreme drought this summer. Queen Anne's Lace is one of the few flowers thriving in the heat. It's considered a wild flower but, surprisingly it's a direct relative of the carrots we eat today. In Michigan, it is commonly found in dry fields or along road sides. Most of us never give it the time of day. However, the delicate lacy blooms are a coveted filler in summer wedding bouquets.

One of my staff members is getting married next month. It's a casual outdoor setting and she asked for help decorating the reception tables. Queen Anne's Lace seemed the perfect choice since Mother Nature has provided an abundant crop.


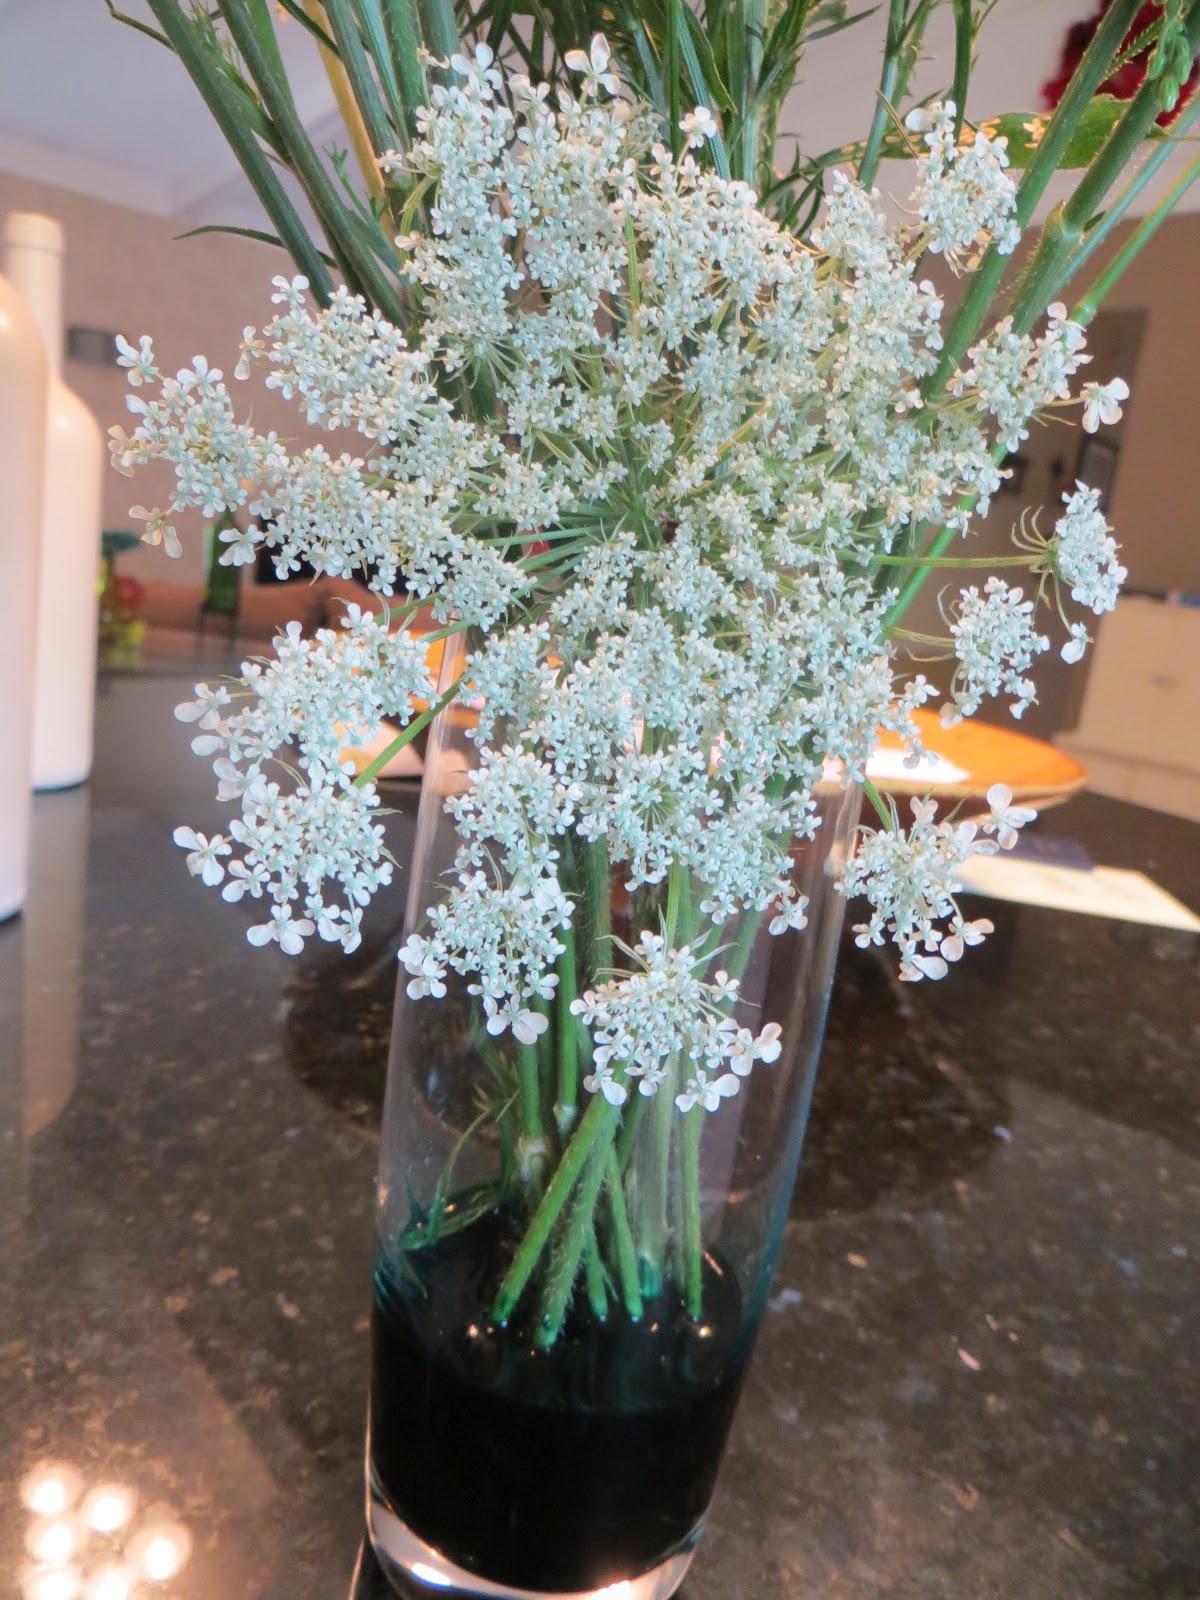
The wedding colors are turquoise and coral. Since this flower readily accepts dye, the petals can be color themed to fit any wedding. Here's a pic of the turquoise flowers. I'm experimenting with a coral color this week. I'm excited to see the trio of white, turquoise and coral flowers intermingled within wild greenery.

Coloring Queen Anne's Lace Flowers

The flowers will display in chalkboard graffiti wine bottles with random placement of crystals and jewels to add conserative 'bling'. Fun graffiti plans are in the works for the wedding guests (can't share at this time).

You may purchase the dye to color these flowers at GoPlanetEarth. Mix 2 parts water to one part dye. Allow flower stems to sit in the mixture for 4 hours, then add additional water. Let stems absorb the dyed water overnight. You'll be surprised with the color change after 24 hours.

TIP: Cut the flower stems at an angle before placing the the colored water.

Monday, July 16, 2012

Business 101: Create A Business Plan


My daughter and son-in-law are vacationing in Mexico for their 10-year anniversary. Hence, the "free" babysitters have the grand kids for 8 days. Each day we do a special project. It keeps them occupied and away from electronic devices. Yesterday, our project was robot inspired.


Miss O helped set out project trays and disburse robot parts.


I handled the spray painting and hot glue gun. The first step, and most difficult, was plotting the robot design.

It was intriguing to watch each child explore their options. As you can see, their ideas were all different and unique.

Carson made a TV and remote for his robot. Four year old, Fischer gave his robot a light bulb brain  (he pretends the light bulb glows when the robot is thinking "really hard").


Of course, Miss O designed a Princess Robot in pink and purple colors. I opted for an all silver robot that we call the Techno Robot.

Positioning the robots for a photo shoot, I was reminded of the uniqueness of the human mind. Each of our project trays contained the same parts; yet, each finished robot was distinctly different. The direction each person took to complete the project didn't matter. The bottom line was they finished.


In the early years of starting an online business, I was a "newbie" seeking to carve my company's identity. The competition was intimating. Assembling a business plan was not unlike the robot parts. What glue would I need to adhere all the ideas into something functional? If I failed, could my business plan be revised and reassembled?

Current economic woes have forced many into seeking alternative ways of making a viable living. With the growing number of small businesses trying to gain entry into the market, you need a plan. Especially if the Internet is your major marketing avenue. My next blog post will be address how to create a realistic business plan for success.

Friday, July 13, 2012

New Blacktop at Warehouse


There has been plenty of heavy equipment hanging out with us the last few days. These guys are digging up, replacing and resurfacing the current blacktop at our warehouse. Gotta love 'em as it's in the upper 80's.

The guys told me I could post a picture as long as it wasn't on Face book. I promised it would only be on my blog.

Accolades to these hard working men! If you think you have a difficult job, think twice. Most of us aren't pouring black top in excessive temperatures. The temperature of heated black top is around 300 degrees Fahrenheit.

Thank you Black & White Paving for a great job! Our delivery drivers and employees will appreciate the newly paved area.

Monday, July 02, 2012

Fortune Cookie Wedding Favor


Fortune Cookie Wedding Favor Soaps

The last few weeks, I've been brainstorming about wedding favors. GoPlanetEarth is gifting wedding favors to one of  our long time workers, Kaylee. She been with us for seven years and is tying the knot in August. Her wedding colors are turquoise and coral. I love the bright color combo.

The final (Kaylee approved) favor is pictured. The coral ribbon was shipped from Hong Kong. Yes, that's correct... Hong Kong! I needed just the right coral color, so I jumped on Ebay and found the perfect match.  Bulk chopsticks and turquoise take-out boxes are enroute.

I designed the round monogram seal and seating placement card in MS Publisher. A personalized fortune cookie is tucked inside each box. Kaylee is foregoing seating assignments, so I will be revising the favor card. In place of the guest name and table, there will be a message for each guest to do a "fill in the blank" fortune for the wedding couple. Guests slide the card from the chopsticks, fill in a message and drop card in a fortune cookie shaped box. How fun!

Fortune Cookie Wedding Favors


Place 2-3  fortune soaps in each box (heat-seal them in a poly type bag before placing in the box). Consider dipping cookie soaps in colored soap base and embellishing with sprinkles. The packaging design pictured might include coral colored soaps dipped in a turquoise color and dressed with white sprinkles, or vice versa.


Let your imagination run wild! There are so many color combinations you can use.
Checkout GoPlanet's printable fortune cookie sayings.

Chocolate drizzled fortune cookie soap favors.