Sunday, October 17, 2010

Soap Dishes: The Project Part III

Here we are into Part III of our soap dish project. In Part II, I posted the recipe for mixing the concrete and sand. This post shows a big leaf bowl that my friend, Peg designed. She's really gotten the hang of how to make these dishes and I wouldn't be surprised if some of her work is displayed at one of our local Art Fairs. I can't wait to see how she paints the bowl. I'll be sure to upload pics of her finished bowl.

As you can see in the first pic, Peg placed a leaf inside the molded bowl. She did this by placing a large leaf on top of the sand hill (that is covered in plastic) and then slowly began adding the concrete mixture until she had built up her bowl to the desired size and thickness (see below). The leaf still inside the bowl will be removed by hand. Sometimes the leaves remove easily, others require a bit more work. Peg was working on removing the leaf from the inside of bowl when I snapped the photo.

Large leaves were then pressed into the bottom of the bowl (vein side down). The deeper the veins, the better the results. Hosta, rhubarb, hollyhock, comfrey are all great leaves to use for this project.

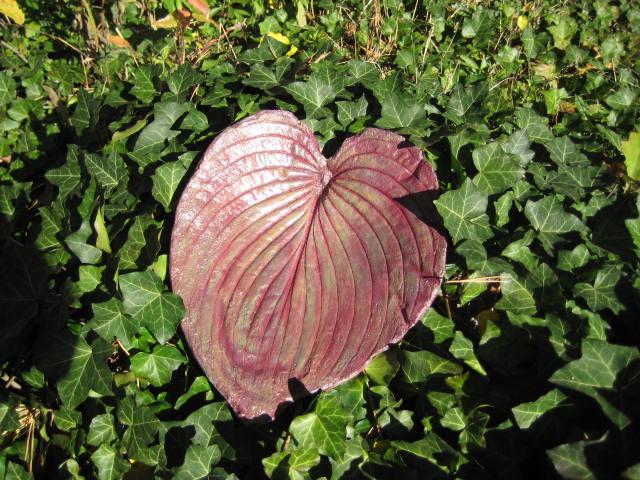
Here is the bottom of the bowl once the concrete dried. As you can see, the leaf impressions are very defined. Peg will now use a Dremel bit to smooth around the edges of the dish before painting. Be sure to wear protective eyewear when working with a Dremel. Dremel kits can be purchased at stores such as Home Depot or Lowes.

For those unfamiliar with a Dremel, it is pictured below.

Saturday, October 16, 2010

And the Winner is.... FREE Soap Making Book Giveaway

Creative Soap Making Book
Thanks to everyone who entered our recent giveaway for Elin Criswell's "Creative Soap Making Book". The winner was Lidia from Potomac, MD. Here is what she had to say about GoPlanetEarth.com:


"Since I saw the site online for the first time, I love being able to choose from a variety of molds, soap bases, colors, fragrance oils, and even packaging options. I ten to go with as natural as possible and I was pleased to see the options I had for the soap bases such as the Pure & Natural soap base, hemp soap base, and even the organic soap base.

I also appreciate all the resources available on the site with the step by step tutorials, FAQs, links to other helpful sites, etc. The site itself is easy to navigate and I can spend hours, if I want, just looking at all the possibilities. Also, whenever I get stuck or have a question, I get an answer promptly which I really appreciate.

I love receiving the packages with the supplies I request and often I get a bonus fragrance oil which is really nice....."


Thanks, Lidia for your accolades. Hope you find Elin's book helpful. We'll get it out to you pronto.

Wednesday, October 13, 2010

Soap Dishes: The Project Part II

OK, we are now into part II of our soap dish adventure. I met yesterday with the girls and we sculpted up a multiple number of concrete leafs. The leaves were all varying sizes and shapes. Of course, the bigger, the better.


The recipe for mixing the concrete and play sand is as follows. How much you mix will depend on how many leaves you will be making (and the size of the leaves).


1) Form a hill of play sand on a flat surface. This sand must be moist as it will hold up the weight of your leaf. Keep a squirt bottle of water near by. You will see what the 'sand hill' should like like in my prior post.

2) Cover the sand with clear plastic being careful not to leave any sand on the top of your plastic. This will cause "pockets" on your leave that will not dry correctly.

3) Mix 2 parts sand to 1 part cement in a small bucket, tub, or anything you have available. Mix thoroughly.If you need too, you can can add 1 more part of sand. The mixing is very important. You must thoroughly mix.


4) Now add water- there is no measurable amount. Use a cup container and SLOWLY add the water! You want to add enough water to make your cement mixture comparable to cookie dough. Mix each time you add water. It's always better to have it a little dry; you can always add more water, but once you add too much water you'll end up with quicksand. No amount of additional sand or cement will be able to fix it.


5) Take your mixture and begin anchoring the leaf. You may want to anchor each end and sides before filling in the entire leaf. You can do this with straight pins (the kind with rounded tops work best). You'll want the thickness of the leaf at least 3/4 to 1 inch thick to prevent breakage. See this post as to how to anchor your leaf on the sand pile.

6) When you are finished sculpting your leaf, allow it to dry for 48 hours. Do not try to flip it over too soon or it will crumble and crack.

7) When the concrete has hardened, flip over your leaf placing one hand under the plastic and the other on the top of the cement leaf. Remove the leaf. Some leaves will come off easily while others require more labor. Let the cement leaf cure for at least another day before painting. You can use acrylic craft paints purchased from stores like JoAnn's or Michaels.

8) After painting (front and back sides), let the concrete leaf dry for 24 hours and then spray with a clear protective lacquer sealer. Allow to dry overnight and then spray a final layer of sealant.


There you have it... cement soap dishes ready to display your handcrafted soaps. We will have more upcoming photos of our finished soap dishes (we are even making bowls) displaying soaps made with GoPlanetEarth products.


Monday, October 11, 2010

Soap Making: How to Make Gelato Soaps (Recipe #1)

A customer emailed a few weeks ago wanting me to post a recipe for Gelato Soaps. Hmmm... some of you may be wondering "What is Gelato?" Gelato is a type of Italian ice cream (slightly lower in fat). However, our Gelato soaps are calorie free and a perfect gift for the holiday season.


We have a couple of variations on the recipe. This is our Gelato Recipe #1. We'll be posting recipe #2 recipe in a few days along with a short tutorial on both.


Recipe #1 is made with the addition of our whipped body butter. It offers a nice creamy texture to the gelato and makes for a wonderful body wash. We even included some of our spa quality sea salts as an exfoliant (and some sugar as well to work as a scrub). The addition of citric acid gives a bit of fizz, but the Gelato isn't really meant to be a bath fizzie. It's more about moisturizing.

If using this recipe, I definitely suggest letting the mixture set up for 2-3 hours before using the ice cream scoop. It was hard to get the mixture to drop out of the scooper until it was slightly firm.

Gelato Recipe #1:

Put all dry ingredients in a large mixing bowl. Incorporate ingredients thoroughly.

Next, combine the melted body butter, fragrance and color. Mix well and then slowly drizzle over the dry ingredients. You will want to put on latex (or something similar) to mix the wet into the dry ingredients. Squish the mixture until is looks like the consistency of wet sand. The mixture should hold together when squeezed in the palm of your hand (see above photo).

Using an ice cream scoop, scoop out balls of the gelato soap mixture. We were able to get 7-8 balls from the above recipe.

To Use:

Slice off a section of the gelato to use for your bath or shower. There are so many different ways to display your Gelato soap. Consider using a lidded plastic sundae cup along with a ice cream tasting spoon. Or, just display on a soap dish with a small cheese spreader. Use the cheese spreader to cut off serving portions of the Gelato Soap.

Soap Dishes: The Project Begins

A few days ago I posted about a soap dish I was going to make. You can read that post here. On Sunday, I began the project. It takes about a week to complete. Here are photos of what has happened so far.

You need to pick your leaf. This is a leaf from one of my Yucca plants. Pick a leaf that has no holes (from insects) and is still fairly green. Many leaves are already turning brown due to the Autumn season. Those might not work so well. A leaf with pleny of veins is a perfect fit.

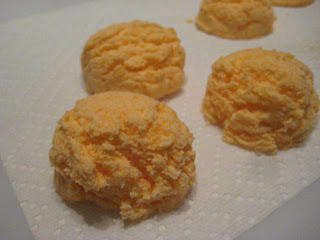
My neighbor mixed up the concrete. I'll have the correct mixing ratio posted soon. Basically, you just mix water into the concrete until you get a consistency as shown. It's very similar to the same consistency you want when making fizzing bath bombs. You want to be able to squeeze the mixture until it feels and looks like wet sand.


Once you have the right consistency, you pile the concrete mixture onto your leaf. The leaf is sitting on top of a pile of sand that is covered with a piece of plastic. Your goal is to create a curved area in the center of your leaf dish and the heaping sand helps to create this concave area.

Work with small amounts of the concrete to build up the leaf. Smooth with your gloved hands (we used latex gloves). You can also use a spray bottle filled with water and spritz as needed onto the concrete to help create a smooth surface.

Our leaf is complete. Now we must let it dry for about 3 days. I will be posting an update on this project once the concrete dries and the leaf is removed. At that point, the painting process begins. Oh what fun! Tomorrow night I'll be meeting with a group of friends to form even more leaves. Tonight, I'll be peeling apples (from a local orchard) to make an apple crisp to share tomorrow with my crafty friends. I've posted that recipe. The Apple Crisp is easy and awesome tasting. Add a dollop of vanilla ice cream and you're good to go.


EZ APPLE CRISP RECIPE:
  1. Core and peel 7 apples (I like to mix about 3 different varities of apples)
  2. Mix sliced apples with 3/4 cup brown sugar and place into a 9-inch square baking dish (or something of similar size).
  3. In a separate bowl combine 1 1/4 cups flour, 1 cup white sugar (you can also use Splenda), 1 1/2 teaspoon ground cinnamon, 1/4 teaspoon salt.
  4. Add 3 tablespoons melted butter to one beaten egg. Stir into the flour mixture and spread evenly over the top of apples.
  5. Bake in preheated oven at 375 degrees for 35 minutes, or until topping is golden and crisp.
  6. Serves 8 people.

Friday, October 08, 2010

Soap Dishes: Display Your Handmade Soaps in Style

I had a chat with a couple of neighbor friends about an upcoming charity event. In the process of that conversation, they shared these beautiful handmade garden art shaped from "real" leaves casted in concrete. Of course, my soaping mind went haywire thinking of all the neat things you could do with this concept... like making handcrafted soap dishes to go with your handcrafted soap!


I meet with my friends next Tuesday and they are going to show me how to make these incredible handcrafted items. I am going to make a few that are a smaller soap dish size as well as other larger trays. What a great way to display your handcrafted soaps for the holiday season. I'm lovin' it!

I'll be sharing the "how-to". So make sure you stay posted.


Sunday, October 03, 2010

When Life (and Business) is Less Than Perfect.... Make Applesauce

Wouldn't it be grand if life was perfect? Fat chance! So what does one do when plans don't turn out as expected, when a business fails, or life just happens? You make applesauce! And that's exactly what I did.

I returned from a Chicago trip this past week. Besides spending an exorbitant amount of money on an unexpected business dinner, I soon discovered that I had lost my return train tickets. Let's just say things were less than perfect and certainly did not turn out as planned. So what does applesauce have to do with all this? If you have ever visited an apple orchard you will find huge bins that contain less than perfect apples. They are generally bruised and considered the harvest seconds. For whatever reasons or circumstances, they are less than perfect. Business and life can be the same. You can plan to your heart's content, do everything within your power to reap benefits from your investments, and even hire the best consultants to ensure you are on track. However, there are times when life just happens and all our tireless efforts fail. We all have those bruised apple moments. So what do you do?

You make applesauce out of those life moments. You drop all those "ugly, bruised, can't do this any more, why did I ever think this would work, what was I thinking, why me" moments into a big pot and steam them until they are mush. It's really quite amazing how you come out with something entirely new. It is what I call life's applesauce. It's mixing a variety of different life events, circumstances and moments that have gone bad and incorporating them into life's mixing pot. You then put them all through a sieve, discarding the ugly stuff, so you can produce something even better.

My grand kids sure enjoyed this week's "applesauce moment". When you think that all is hopeless, when you're not sure how to turn a bad experience into something good, when you question why bad things happen to good people, or get frustrated with the bruised apples that fall at the base of your tree of life...remember, make applesauce!

Thursday, September 30, 2010

Get Your FREE GoPlanetEarth Logo Luggage Tag

Besides being known for our FREE Fragrance oils samples that we include in orders starting at $30 or more, we occasionally include other FREE items. This happens to be a "just for fun" freebie that is ideal for anyone who travels. If you are traveling to one of the many soaping conferences held throughout the US, this sassy luggage identification tag will make it easy to spot your bag on any airline luggage carousel.


Front side of tag displays our GoPlanetEarth logo and the flip side reads "OMG! Stop grabbing me! Order $60 or more in product starting October 1 and receive one for FREE. Limited quantities, so order early to ensure one is included with your order.

Tuesday, September 28, 2010

Beyond Soap Making: Happy Birthday to Me!

It's been a whirlwind day. Between responding to the many wonderful birthday texts, FB posts, emails and deliveries.... I am ending my birthday with a big AHHH! It's so nice to be remembered. Pictured in this post is the cake and beautiful bouquet from my morning workers (Kristy, Chelsea, and Missy.... thank you!!!!!!!!)


My grandkids sent another lovely floral arrangement and many cards came by mail. It's been a crazy, busy day filled with so many grand surprises.


Monday, September 27, 2010

Melt & Pour Soap Making: BFF Weekend Soap Gifts

Melt & Pour Soap Making: BFF Weeend Soap GiftsMy daugther has linked up with her BFF college friends for the last 12 years. There are 10 BFF girls. They meet every year at some way cool lodge, house or resort for an extended weekend. My job is to come up with gifts for my daughter to present to each of her BFF gals.

BFF Weekend Soap Making Gifts
After spending a weekend in Chicago and seeing all the Fall & Autumn displays, I found the perfect gift. An Autumn soap using our new Water Dissolving Paper.

I presented the idea to my daughter (we have some cool Winter ideas in the works as well) and she loved it. These soap leaves were printed on our GPE Water Dissolving Soap Paper. The template is sold on our web site. We used a color laser printer. You will want to be sure that the laser printer is cool before printing. If you want to print mulitple sheets, wait at least 10 minutes before inserting and printing the next sheet. You can also use an ink-jet printer, but you risk issues of colors bleeding. To help prevent this color bleed, you may need to spray with a fixative. Hairspray works well, but you will need to let the printed/sprayed paper sit for a few days. The laser printer does not require this step.

Cut around the edges of the printed leafs.

Autumn Soap Making Gifts

Melt clear soap base in the microwave. You will only need to melt enough soap base to dip each leaf. DO NOT OVERHEAT. Dip the leaves in clear melt & pour soap base keeping the temp to around 125 to 130 degrees. You can scent the soap base if you wish. For my daughter's event, I used Apple Autumn fragrance since my daughter will be purchasing an apple or apple cinnamon candle to compliment the soap leaves.

It took 3 of us to test these soap leaves. We took turns washing our hands until the soap dissolved. Our guess... you can use each leaf for about 3 hand washings before it totally dissappears. My staff had fun with this design and I must say, at the end of the day we all had very clean hands.

My daughter will be packaging these soap leaves in one of our glassine envelopes and creating a hand-made greeting card (with some kind of clever message) to present to her alumni friends. Once I've helped her create the packaging, I will post on my blog for inspiration.


Monday, September 20, 2010

Suiting up for the Season: We want to offer you the best!


It's that time of year in Michigan.... Autumn. I'm having fun decorating my yard for the season. I know many of you are gearing up craft shows, retails sales, or holiday gift-giving. Times are tough and each of us are trying to put our best foot forward and be sure that the money we have invested in supplies reaps some kind of benefit. That could be in $$$ or in a simple thank you from someone that receives your handmade gift.


This armoured knight is displayed outside my front door. It reminds me that I need to guard against complacency and treat my customers as if they deserve wine and flowers for every order they place. After all, my customers ARE MY BUSINESS!


And the yellow clogs outside my front door? A reminder that I'm wearing the same shoes as my competitors so I need to always find ways to make my company different. I don't want to be the brown shoes... I want our company to be the yellow shoes and stand out in the crowd.

Sunday, September 19, 2010

My First Bee Sting!!

Believe it or not, considering my age, it's incredible that I have never been stung by a bee. Today was my day of reckoning with the bee. I stopped by a locally owned farm to pick up mums and some vegetables. In the midst of my purchase, a bee stung me on my finger. OUCH!!!


Oddly enough, my Mom had recently sent information on what to do if a bee stings you. I remember seeing this on the Net a while back, but gave it no credence. However, seeing my finger immediately swell, I decided to give it a try.

Supposedly, you are to tape a copper penny over the bite for 15 minutes. I did this using a band-aid to keep the penny in place. A number of individuals swear that the next day, you will find no signs of the bite. I can't confirm at this time. Howevver, I will say that after taping the penny to my finger, I find that the swelling has diminished. We'll see what happens in the morning.


EDIT TO THIS POST:
Yes, it works! Can't tell you why or how, but the penny did draw out the bee serum and the swelling is completly gone. Incredible! I would never have been a believer.

Sunday, September 12, 2010

Celebrating Grandparent's Day

It was a beautiful Fall day here in Michigan. Ideal temperature, sunny and an afternoon with grand kids, daughter and Mom. What better way to spend Grandparent's Day. Four generations of family! Our day included shopping and a stop at Michael's to pick out crafts projects for the kids and Fall floral items for myself. I'm doing a couple of floral arrangements for gift-giving and was like a kid in the candy store picking out containers and floral items. My mind was whirling with ideas of what I could do with this and that... and of course, 50% off floral items put me in a spending frenzie!

When we returned home, these were the lovely paintings that my two oldest grand kids presented to me in honor of Grandparent's Day. Miss O's painting is above and Carson's painting is pictured below. It was a wonderful day! Now... back to work for me. I'm trying to get a jump-start on Monday while working from home.


I just posted our two newest products, so be sure to take a peek.

I'll have pics and a brief tutorial on how to use the dissolving paper posted soon. How fun would it be to use artwork of kids (or grandkids) on the face of a soap? I just might have to give that a try with this new paper!

Saturday, September 11, 2010

Costumes: Good Anytime of the Year

My grand kids are in love with costumes. They play dress up year round. However, this weekend was special. The Halloween costumes that I ordered online arrived yesterday. I always order them early to ensure they don't sell out and are available in their sizes (yes, I know that's anal, but that's how I am!)

They have been playing in these costumes all day, and if I had to guess... they'll be sleeping in them as well. Oh to be a kid again!

Miss O is Cinderella and was all about the tiara and wand. Oh... and let's not forget the blue neck choker. My little Fish wants to be a cowboy so the whole Woody attire was perfect. He loves the cowboy hat and the (goofy, but cute) spongy type boots that accessorize his ensemble.

And then there is Carson. As the 2nd grade big brother, he was all about something scary. His mommy and daddy are very careful about the kind of "scary" costumes he can wear. This one worked just dandy and didn't scare little brother or sister. So, that's how I spent my Friday night and Saturday morning. There was one exception. I treated myself and daughter to a pedi and mani this AM while the costume clad grand kids chased Poppy around the house. He was a real trooper.

Hope you are enjoying the weekend.

A Special Note of Thanks

A while back I posted about Kids Saving the Rainforest which is a wonderful organization that I firmly believe is worthy of attention. Well, as promised in my post, GPE did ship the free soap supplies plus some. Here is the email I received over the weekend:


Dear Denise!
Thanks so much for sending the soap making materials! We just got them when we got to Miami! They are absolutely wonderful! It felt like Christmas morning opening them. We are all so grateful and excited, we can't wait to get back to Costa Rica to start making them.

We will keep you posted as to how it goes and we can't wait to order more from you and pay for them!!! We are very grateful to you!

Thanks so much,
Jennifer and KSTR


To Jennifer, I say this. Your gratefulness is noted and it is refreshing to have someone take time to express it by sending a note of thanks. I hope Jennifer keeps all of us posted about the soap making endeavors of Kids Saving The Rainforest.

Emails like this (and many other wonderful emails we recieve from customers) is what motivates our company to offer the best possible service.

Monday, September 06, 2010

Save Over $111 on a FULL SET of Monogram Soap Molds

55% Off Monogram Soap MoldsUnheard of savings. 55% OFF full monogram script mold sets. That's over $111 off!!!! There's only a limited number of sets available at this price. First quality, no seconds, no flaws. Snatch up a set ASAP. Monogram soaps make great gifts for the upcoming Christmas season. These are top notch plastic molds good for both MP and CP soapmaking.

55% OFF Monogram Soap Mold Sets Each sheet contains two cavities of the same letter and measure 3 7/8" x 2 5/8" x 1" deep (4 ounces per bar). Letters are deeply scripted and suitable for soap paints or dusting with mica powder. Any of our liquid gel soap colorants can also be used as soap paints. Finished soaps fit box size BO-7.

55% OFF Full Set of Monogram Script Soap Molds

Happy Labor Day Soaping Friends!!

Whether you're taking a break from soaping, or finally have a day to do those fun soaping projects, I hope you ENJOY THE DAY!

I'm sitting in my home office writing this post and there is a distinct smell of Fall in the air. My husband is out back burning tree branches and the smokey smell reminds me of burning leaves evoking many childhood memories. Especially memories of my Dad. It's nearly two years since his passing and September is a month that stirs up memories. I'm not sure why Fall evokes such vivid mental pictures from my past. Maybe, it's the sound of high school football, the kids returning to school, hearing the marching band practice from the nearby campus, the turning of the leaves, the crisp smell of an Autumn morning, the excitement of carving pumpkins, cutting corn stalks, or raking leaves..... it's a mystery.

Fall will always be one of my favorite seasons and Autumn in Michigan is what helps me bear the miserable, cold Winters. Labor Day marks the last hurrah of Summer for us Michiganders. My husband spent the weekend working on an outdoor fire pit. I can't wait to use it and neither can our grand kids. They are fired up (no pun intended) about camping out in the backyard, roasting marshmallows and telling camp stories. We should get plenty of use out of the fire pit through this Autumn season.


Normal business hours will resume tomorrow. If you've placed an order over the weekend, bear in mind that we are going to be slightly behind due to the extended holiday weekend.

Friday, September 03, 2010

Using Mold Market's Tray Soap Mold

Mold Market Tray Mold I happened up on Little Sparrow Soap Company Esty shop this morning. Once again, I see another unique way that someone is using Mold Market's 8-bar Rectangle soap mold (Items #79) to produce some awesome soaps. This retro soap design was created by Libby. Great job!

Mold Market Tray Soap Mold

Thursday, September 02, 2010

My Friday Fix: Dragon Dictation App for iPhone


The folks at Dragon have developed their own iPhone app that lets you dictate to your iPhone—and it works really well.

The app is a breeze to use. Just fire it up and press the Record button to start dictating. When you're finished, Dragon will put together its best estimation of what you said (I was surprised at its accuracy). If it's not quite right, you can edit the text with a keyboard or tap on individual words for alternate suggestions. When the text is just how you want it, Dragon can copy the text to your clipboard and optionally launch a new email or text message. If you're not a fan of the iPhone's soft keyboard, Dragon Dictation might be right up your alley.

Dragon Dictation is currently a free download, requires iPhone 3.1 OS or later.

For the record, one of my workers brought their niece to work today (she's going into 5th grade). She was the one that found and loaded this app on my iPhone. She's a whiz (aren't all kids these days) with iPhone and iTouch apps. She made my day. No more trying to get my fingers on all the right keys when texting. This app will save me SO MUCH TIME!!!

Sidebar: My husband wanted to know what this app would do with "naughty" swear words, so we had to try it out. I'm sorry, but our curiousity got the best of us. It puts a "*" to bleep out parts of the word. Pretty cool.

Hope you all enjoy the holiday weekend. We are closed Friday - Monday to enjoy the Labor Day weekend. It's last last hurrah here in Michigan before the Fall season. It already feels and smells like Fall.

Wednesday, September 01, 2010

Finally, the tutorial on how to use Mold Market's new 3-D soap molds. This tutorial shows you how to use the Popsicle and Oval Leaf molds. I'm in love with the Oval Leaf mold. It produces a classic soap that has a hand-milled look. PLUS... you can insert a soap rope in the pouring channel to make "soap on the rope".


Once the molds are prepped, they are good for many soap pours. All you need to do is align them, secure the two halves and pour. Each sheet mold produces one 3-D soap. You can purchase the molds at GoPlanetEarth.com. You'll find the Oval Leaf listed here and the Popsicle here. We're offering a limited 15% off introductory special on them right now; so, this would be a good time to make your purchase.
One tip when using these molds: Keep your pouring temp to around 135 to 139 degrees (Fahrenheit). A lower pouring temp will keep the soap from seeping out between the joined halves. I had no noticeable issues with soap seepage when pouring at a lower temp.