Thursday, October 11, 2012

Mad Scientist: Costume #2 with Slime


Last week, I posted pictures of my grandson's Mad Scientist costume for his upcoming backyard camp out. At age nine, he's all about the Halloween gore. However, for school it's not acceptable so we needed a back-up costume. This is it.

I purchased a second lab coat and dusted it with neon green powdered colorant (Yep, the same color used in soap making). I again used the salt tubes sold at GoPlanet and filled them with various ghoulish looking items. I also made some slime (see recipe below) that I will pin to the lab coat in various places. I won't do that until the day of his class party because the homemade slime needs to stay in the fridge until used.

I didn't have a pocket protector so I used a soft eyeglass case and stuffed it with some ink pens. Every scientist needs pens to formulate their calculations, right? I found some electrical wire and a couple of electrical wing nuts in the garage. Let's see... latex gloves, test tube vials, plastic syringe, creepy plastic spiders, a bat and of course, what's a lab cost without some kind of skeleton part?

Slime Recipe:
  • 1/4 cup glue (I used Elmer's, but any off brand will do)
  • 1 cup water
  • 1 tablespoon borax powder (you'll find this in the laundry isle of your grocery store)
  • 1/4 additional water (put this is a separate cup)
  • Ziploc bag
  • Food coloring (I used green)
 Add borax to one cup water. Stir until dissolved. Mix the glue and 1/4 cup water together (50/50 solution).

Add equal parts of the glue solution and borax solution in the Ziploc bag. One half cup of each solution will yield one cup of slime. Add food coloring and seal the bag. Knead mixture until it becomes putty-like. Store in the fridge inside a sealed bag when not in use.

Here's the squishy, gooey slime that will be part of the costume. Best part, kids can play with it even after Halloween is over.


Every Mad Scientist must keep records. I recovered the front and back of an old book (it was one of those hard cardboard baby books) with printed artwork. I didn't want to recreate pages, so I placed a rubber band around the outside of the book...seemed like something a mad scientist might do.
The back cover is a printout of chemistry equations and clearly indicates that this scientific book is the property of Dr. N. Telligent.

The little wiry gizmo by the book is going to be glued to the top of the mad scientist wig I purchased. It's just a bunch of gadgets glued to the top of a plastic storage container.

If your finances are strapped, head on over to a thrift store and purchase a white dress shirt for the lab coat. Cut of the shirt tails and use them to create extra pockets for the lab coat. Press the bottom of the shirt and stitch the hem for a nice finished look.


Sunday, October 07, 2012

Melt & Pour Soap Making: Halloween Silhouettes


A molded soap shape, hair spray, powdered colorant and a silhouette cut-out.... it's that simple. Each of the soaps shown were created with a paper silhouette that was positioned on the face of the soap with hair spray. The hair spray keeps the cut-out in place while dusting the silhouette edges with color.

A rat, graveyard scene, ghost, beheaded lady, pumpkin, owl and cats. So many options for creating these easy and fun Halloween soaps. Just be sure to blow off any excess powdered color before removing the cut-out silhouette (do this outdoors or over a garbage container).


Before you ask, YES, the powdered colorant will come off when using the soap. And no, it won't stain your body when used in the shower. This soap is for fun, and the silhouettes are only meant to capture the season.

The silhouettes were printed  and then cut out with a craft x-acto knife. If you print your stencils on card stock paper, they can be used several times. A thin coat of hairspray on the top of each finished soap (allow the hair spray to thoroughly dry) will keep the powdered color from smearing when wrapping the soaps.

GPE's Mad Scientist Halloween Costume


It's that time of year for scare and fright. My 9-year old grandson is all about gore this year. It was decided (with parental guidance) that a Mad Scientist costume would be appropriate. Since face masks or face paint is not allowed at their school Halloween party, we opted to make the lab coat the primary focal point of his costume.

I ordered a basic child's lab coat online. Cost was under $20 and also included a white mad scientist wig. The use of GoPlanetEarth products completed the look.

1) Latex gloves dipped or soaked in red colorant. I used both DWP red and liquid gel tomato red or red oxide. LET THE COLOR DRY COMPLETELY before attaching gloves to the lab coat.

2) Every mad scientist needs tubes filled with disgusting, yucky stuff. I filled a couple of GPE's 1 x 8" plastic salt tubes with 4 x 4 gauze sponges soaked in red colorant, uncooked oatmeal, water, corn syrup... whatever you can find around the house to make the tube look gory. Place a label on the tube to identify its contents. I decided on Monster Goo, Werewolf Blood and Rat Brains.

Seal the tube caps with super-glue to ensure none of the gory contents spill onto the classroom floor.
3) GPE's natural plastic tubes are a great addition to the mad sceientist's lab coat pockets.


4) It never hurts to add a few plastic spiders to the test tubes. The soap injector makes a great accessory for this lab coat costume.

5) Now for the blood and gore. Take the lab coat, colorants and paint brush outdoors for a creative painting session. I started by dipping a large craft paint brush into DWP red colorant (with water added). Dip the paint brush and throw the mixture onto the lab coat. Paint streaks onto the coat as well.

The last coloring step was taking tomato red or red oxide liquid gel color (add a small amount of water) and splattering onto the lab coat (with a paint brush).  The darker red color is a nice contrast to the DWP red.

6) Attach a few vinyl bats to the lab coat with super glue. I dipped an old cotton rag into the red paint and pinned to the shoulder area of the lab coat. The latex gloves were pinned to the lab coat pockets.

The only thing missing is the wig and the surgical shoe covers. My friend is bringing me shoe covers from the hospital. I will spray them with red colorant and have my grandson put them over his shoes.

My grandson gives this costume an A++ rating!

Melt & Pour Soap Making: Dino-Myte Soaps for Kids


These vinyl dinosaurs were a hit with my grand kids (ages 4, 6 and 9). Mold Market's duck pond mold makes a perfect base for these little guys. Color soap and allow it to set up. Then shred the soap with a cheese grater. Secure the grated soap to the (duck pond) base with clear melted soap. Dip bottom of  dinosaur into the melted soap and seat on top.

These soaps fit our new cupcake cello bags BUT, you will want to first shrink wrap or stretch wrap the dino soaps before placing them in the bag. The soap tends to scuff the inside of the bag if the bag is moved around. The bottom of the duck pond fits nicely into the cupcake insert. Our cupcake boxes or flower top apple boxes might work as well though I haven't experimented with them.

Saturday, October 06, 2012

Soap Packaging: Cupcake Soap Bags


This is one of the best values around for packaging cupcake soaps. It fits Mold Market's cupcake molds #276 and #211 (pictured above). A gusseted bag that measures 4 x 4 x 9" in height. Includes a cupcake insert.

Fold top of bag and punch two evenly spaced holes. Thread ribbon through the holes and tie a bow. Apply a label, and you have an inexpensive soapy holiday gift. I've included FREE PDF labels. Print, cut and apply to cupcake bag with double-sided tape.


Soap Packaging for Apple Soaps


This is one of GoPlanet's newest boxes. It's a perfect fit for Mold Market's apple soap. I suggest placing the soap into a 4 x 2 x 9 cello bag before boxing. This ensures the box interior stays nice and clean without any noticeable soap marks.

The drop in (folding) insert is a perfect fit for the apple. Gather the flower top portion of the box, add a ribbon and your soap is shelf ready for a retail gift shop.


We dipped the soap in a caramel colored soap base and sprinkled with spa quality sea salts colored to look like chopped nuts.


This picture presents a good feel for the actual size of the apple soap. What teacher wouldn't love to have a fresh smelling apple soap placed on their desk this Fall season?

Print an 1-inch wide x 8 1/2-inch label band (cut to size as needed) to fit around the outside of the box. Get creative with the label. I would love to see what you create and share.


Thursday, September 27, 2012

It's a Good Day When....


 ... gifted with a big cup of caramel flavored coffee from Biggby's. Thank you Gabby and Nichelle, a perfect drink to enjoy on this beautiful Fall morning. And yes, the 275 calories on the cup holder did not go unnoticed.

Tuesday, September 25, 2012

Halloween Packaging Ideas: Coffin Box Invitation


My nine-year old grandson wants to have a Halloween camp-out at my house. We care going to park a camper in the yard surrounded by a scary graveyard scene. He's very excited about the event. Food, games, and a campfire are all part of the spooky night.

These are the invitations I created for my grandson's special party. The coffin boxes are being filled with gummy body parts. The party invite is secured inside the top of the coffin. Decorate as you like, as there are so many options. I am using gauze strips to wrap the coffin. Consider dipping gauze strips in red colorant for a bloody effect or wrap natural twine around each box.

Here are the events planned for the Halloween camp-out:

1) On arrival, each guest receives a survival flashlight. The bathroom is past the eerie cemetery.

2) Xplodez Guns. They shoot non-staining red pellets.

3) Bob for apples in a bucket of slime
4) Make a friend into a toilet paper mummy.

5) Air guns that shoot 1-inch glow in the dark plastic balls, along with brain splat balls.

6) Make bloody brain hats.

I'm still working on the food stuff. For sure, we will be drinking posion water and spider cider. Vampire bat wings are also on the menu.


Melt & Pour Soap: Ghoulie Ghost Popsicles


It's that time of year! Upcoming Halloween signals ghoulish, scary and bewitching soaping ideas. Here is another sampling of the fun things you can do with GoPlanet's Pop Mold. Start by pouring a 3/3" layer of white soap into a flexible jelly roll pan. Let the soap set up, then remove from mold and cut-out ghostly shapes. Our recessed smoothing molding tool is perfect for trimming the ghost shapes.

We used suspension soap base and added cosmetic grade glitter. Our color palette was a light purple, light orange and light green. You want the colors to have enough transparency to showcase the ghost cut-out. We used GoPlanet's liquid gel colors.


Step One: Melt the soap, divide into three containers and add the trio of colors (light orange, light green, and light purple). Fill each mold cavity 1/3 full, allow to set up until a thin skin forms. Insert the ghost shape. Here is what I recommend. Take a popsicle stick and the bottom portion into clear melted soap base. Place the ghost shape onto the stick (the melted soap will act as a glue adhesive). Once the ghost is secured to the stick, center the stick into the pop mold cavity. The use of our soap clips will help keep the stick centered.


Step Two: Once the wooden pop stick is securely centered with the clips, pour a second layer of colored soap. Allow the second layer to set up slightly and then pour the final layer. You want to soap to set up enough that the second and third layers do not puncture the previous soap layer.

I failed to mention to Gabby (my worker pouring these soaps) the importance of centering the pop sticks with clips. As you can see in the above picture, the sticks were not centered. It was one of those do and learn moments.


As you see, the finished product was success, even if the sticks weren't centered. My only advise on this project is to make sure you use "rubbing alcohol" between each pour (liberally spritz each layer before pouring the next soap layer). A couple of Gabby's pop soaps lost the top layers when they were released.

TIP: Once the soap are hardened in the mold, place the entire mold in medium hot water bath (you can do this in your kitchen sink). This will help with the release process. These little guys aren't the easiest to release, but once you figure out the process, it's a breeze.

Happy Haunting!

Wednesday, September 19, 2012

Melt & Pour Soaps: Halloween Soap Ideas


Halloween is approaching. Kristy and Chelsea were busy preparing holiday soaps while I was visiting Paris. A big shout of thanks to my former assistant, Kristy, who filled in while I was away. She knows the business well and her presence in the work place gave me peace of mind.

The above soaps were made with Mold Market's square loaf mold. A crinkle cutter was used to slice the finished soap and a few slices were cut into candy corn shapes.

Neon yellow (in white soap base), neon orange (in clear soap base) and white base were the colors used for layering. All of these soap colors can be found here.


These pumpkin soaps are easy to make with our economy pumpkin or silicone Jack-o-lantern molds. Use the soap injector tool to fill in the black areas and green stem. Colorants used: neon orange liquid gel, black oxide, and neon green (for stem area). Our favorite fragrances include apple autumn, harvest moon, green apple, spiced pumpkin egg nog, roll in the hay and turning leaves. These are all great fall scents.


The mummie cupcake soaps are an easy soaping project to do with kids. Use Mold Market's cupcake mold and layer thin strips of white soap over the cupcake top (you may want to slice off the cherry from the cupcake topper). Punch out eyes with a circular shape. Secure all the pieces with clear melted soap.

Thanks to Chelsea for this soaping idea! She did a great job. Her only tip is to be sure you use THIN strips of white soap. Her first attempt failed because the white strips were too thick.

Checkout these other soaping ideas for inspiration. We would love for you to share your favorite Halloween soaps.


Sunday, September 02, 2012

Melt & Pour Soap Making: Granola Fruit Cup


Gabby does it again! This is her original granola fruit cup design. Below is the hand-sketch she drafted. As one of GoPlanet's newest workers, she has fallen in love with soap making and is continually brainstorming new soaping ideas.

A gelato cup was filled with finely chopped brown soap (for the granola). Strawberry halves, orange / apple slices, and blackberries were the fruit components.

Everything was sealed together with a quick over-pour of scented clear soap.

Gabby reported chopping the granola portion of the soap was the most time consuming. I suggested a vegetable grater would be much easier than using a knife. Her response was, "OMG, never thought about that!"

Meet Gabby, the girl behind the soap:

Gabby attends a local community college while working for GoPlanet part-time. She has proven to be a great asset to our team.

Besides working on various soaping projects, Gabby packs, pulls, and checks outgoing orders. She is being trained in all aspects of order processing to better serve you.

It would be nice if you take a moment to give Gabby feed-back on the soaping projects she shares on my blog.

Here are the molds and supplies Gabby used for this granola fruit cup:

What's great about this soap design?  You can place secure the gelato lid to the bottom half (the portion in which you pour the soap). Apply a label and you are good to go.

Wednesday, August 29, 2012

Melt & Pour Soap Making: Wacky Witches


Met & Pour Soap: Whacky Witches

Gabby came up with this wacky witch soap using Mold Market's Ice Cream Soap Mold. This mold is currently being offered at an incredible price, so it's an ideal time to purchase a few for the upcoming Halloween season. Consider using GoPlanet's glow-in-the-dark powder for the witches (lime green) face.

This melt and pour soap project is easy for parents to do with kids. I'm excited to see the reaction my grand kids will have about these Wacky Witch soaps.

Halloween Witch Soaps

We have a few more Halloween soaping ideas up our sleeves, so be sure to check back for more inspiring projects.

Tuesday, August 21, 2012

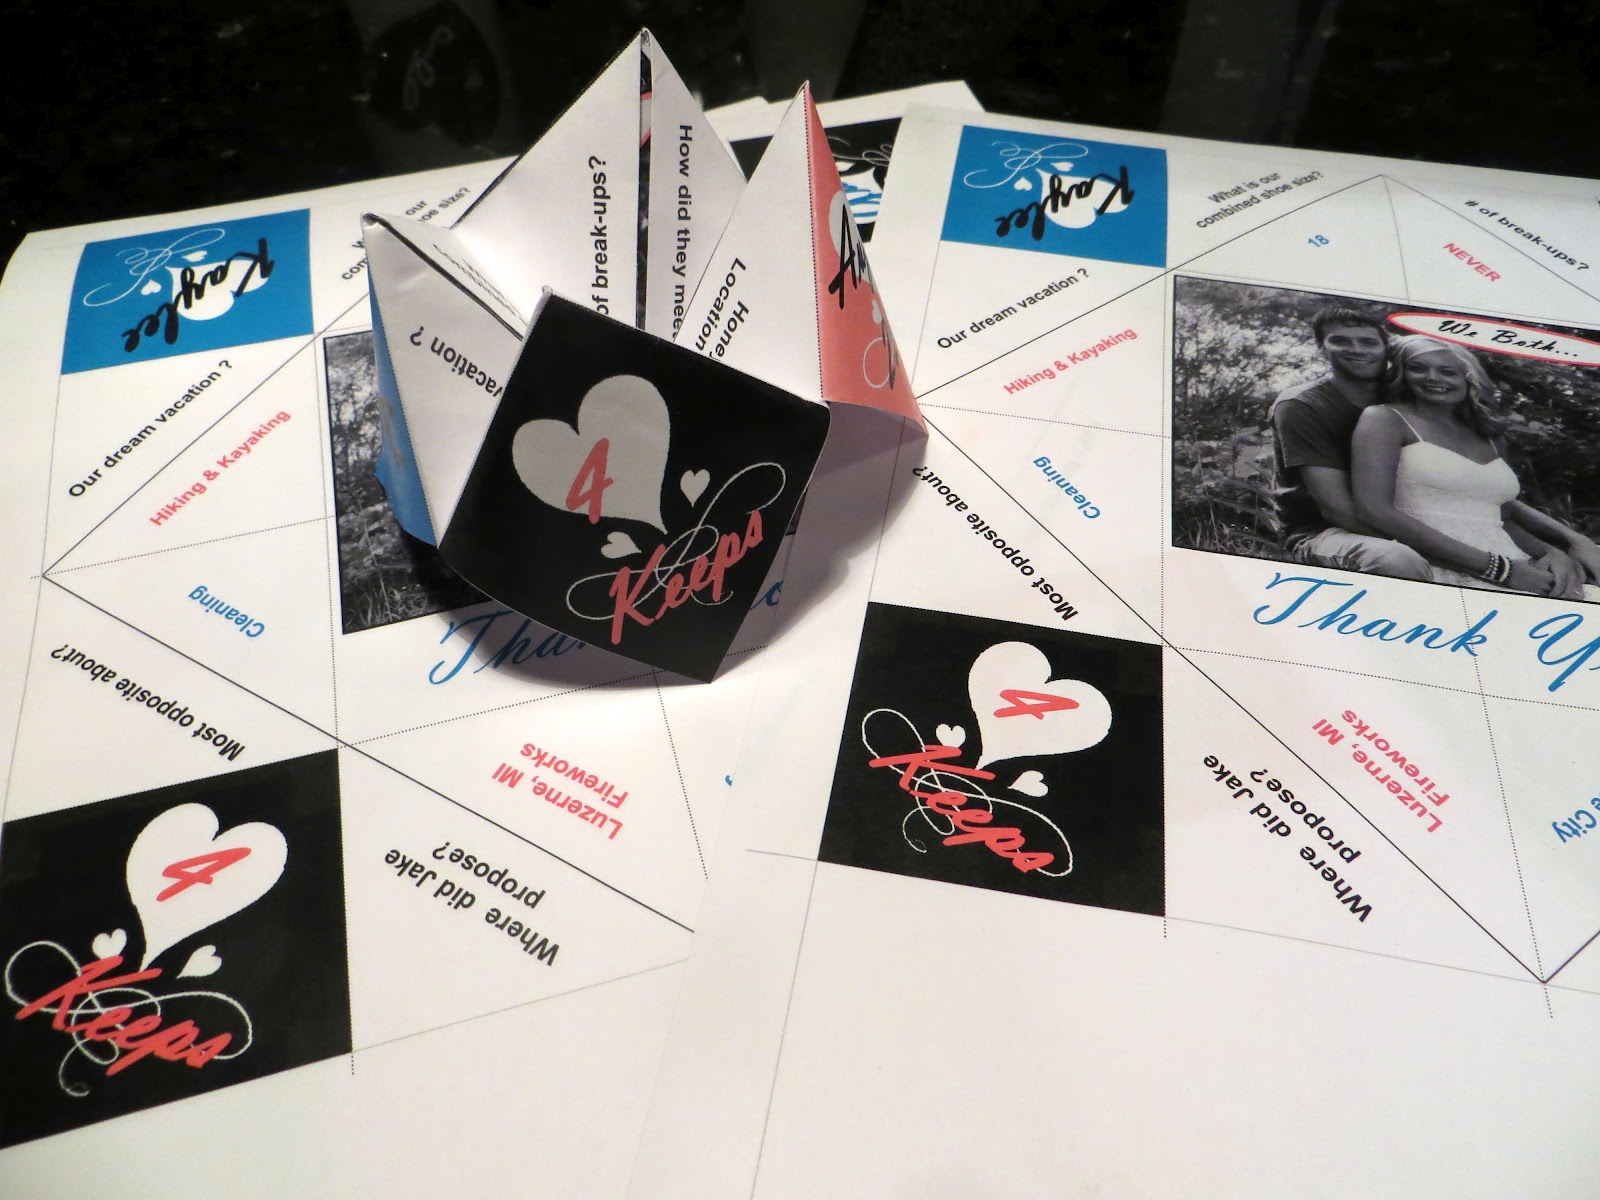
Wedding Cootie Catchers


Wedding Cootie Catcher

For the past month, I've been preparing for an upcoming wedding. I'm doing the reception tables and it's been a blast coming up with "Shabby Chic" ideas. These Wedding Cootie Catchers will be part of the table ensemble. I had totally forgotten about this origami design that we made as kids. It was my nine-year old grandson that inspired this idea.

As I was looking over wedding trivia sent to me by the bride, my grandson said, "NeeNee, you should do cootie catchers!" I was absolutely clueless what he was talking about. "Let me Google it, NeeNee."

And so, cootie catchers have been incorporated into the wedding table theme. I am excited to see how all my decorating plans fall into place. Fresh flowers arrive on Thursday for the painted wine bottles, the personalized fortune cookies were delivered last week, and finishing detail touches are near completion.


Hoping the weather cooperates for the outdoor wedding ceremony. Thankfully, the reception is indoors. No matter what the weather holds, my former administrative assistant of 7 years is getting married. I couldn't be happier for her.


Friday, August 17, 2012

Warning: Deviled Soap Eggs (Do Not Eat)


This week my daughter stopped by to visit. She immediately spotted these deviled eggs on the kitchen counter.
"Ohhhhh, deviled eggs, my favorite", she said.
Grabbing one to pop into her mouth, she quickly realized these were deviled SOAP eggs.
"Mom, why do always do that to me. You make these awesome soaps that look like food. I get excited, only to discover it's soap!"
The eggs were made with Mold Market's Rounded Oval mold. The mold cavities were partially filled with scented white soap. Be sure to pour the soap deep enough to scoop out a portion for the egg topping. A melon baller utensil works well.

Remove the soap from the mold and place the flat side down. Using a 3-inch diameter water glass, trim one end of oval shape into more of an egg shape. Flip the egg white over and scoop out a portion of the soap with the melon baller. Save all the trimmed soap for a future project.

Set the egg whites aside while you make the body butter whip filling. Use either DWP yellow or Flower Child Yellow Submarine colorant. Depending on how much you are making, you will need to eyeball the color. Start with a few drops and add or blend colors as needed to reach the desired shade. Fragrance can be added to the colored body butter whip.

Spoon out portions of the filling onto waxed paper. Sprinkle with a powdered paprika. Melt a small amount of clear soap base and pour into the scooped portion of the egg white. Carefully seat the colored filling on top. Allow to set up.

Final Comments:

  • Are these practical? Heck, no!
  • Are they fun? Heck, yes!
  • Will kids have fun making these? Heck, yes!
  • Can you color the egg whites in Easter colors? Heck, yes! Instead of using the paprika, use cosmetic glitter.
  • Can you actually use these in the shower or bath? Heck, yes!
  • Can you eat them? Heck, no (Hahhah! unless you use naughty words. Washing your mouth out with soap might be appropriate).